Is your VCDS 16.8.0 USB interface not being found by Windows 7? CAR-CODING.EDU.VN offers expert remote support to diagnose and resolve VCDS interface connection issues, ensuring seamless car coding and ECU programming. We provide reliable remote assistance to resolve connection problems, ECU flashing, and hidden feature activation.
Contents
- 1. What Causes “VCDS 16.8.0 Windows 7 USB Interface Not Found” Error?
- 2. Initial Troubleshooting Steps for VCDS Interface Detection Issues
- 3. Detailed USB Driver Configuration for Legacy VCDS Interfaces
- 4. Resolving VCDS Startup Issues Post-Update
- 5. Testing and Firmware Updates: Ensuring Proper VCDS Functionality
- 6. Advanced Troubleshooting: Windows Power Management and Permissions
- 7. Potential Conflicts with Security Software and Other Applications
- 8. Addressing Virtualized OS and Diagnostic Port Conflicts
- 9. Windows 10/11 Specific Solutions for VCDS Interface Problems
- 10. When to Seek Expert Remote Support for VCDS Issues?
- 11. Benefits of Remote VCDS Support from CAR-CODING.EDU.VN
- 12. Common VCDS Coding Issues We Can Help You Resolve
Table of Contents
1. What Causes “VCDS 16.8.0 Windows 7 USB Interface Not Found” Error?
2. Initial Troubleshooting Steps for VCDS Interface Detection Issues
3. Detailed USB Driver Configuration for Legacy VCDS Interfaces
4. Resolving VCDS Startup Issues Post-Update
5. Testing and Firmware Updates: Ensuring Proper VCDS Functionality
6. Advanced Troubleshooting: Windows Power Management and Permissions
7. Potential Conflicts with Security Software and Other Applications
8. Addressing Virtualized OS and Diagnostic Port Conflicts
9. Windows 10/11 Specific Solutions for VCDS Interface Problems
10. When to Seek Expert Remote Support for VCDS Issues?
11. Benefits of Remote VCDS Support from CAR-CODING.EDU.VN
12. Common VCDS Coding Issues We Can Help You Resolve
13. VCDS Coding Examples for Different Car Brands
14. Frequently Asked Questions (FAQ) About VCDS Interface and Remote Support
1. What Causes “VCDS 16.8.0 Windows 7 USB Interface Not Found” Error?
The “Vcds 16.8.0 Windows 7 Usb Interface Not Found” error typically arises from driver issues, software conflicts, or improper installation. This problem can be caused by outdated or corrupted USB drivers, firewall or antivirus interference, incorrect VCDS installation, or conflicts with other software accessing the USB port. Understanding these common causes is crucial for technicians to efficiently diagnose and resolve VCDS connectivity problems.
To further elaborate, consider these potential root causes:
- Driver Compatibility: VCDS relies on specific USB drivers to communicate with the interface. Incompatibility between the driver and the Windows 7 operating system can lead to detection failures.
- Installation Errors: Improper installation of VCDS, particularly failing to install the necessary USB drivers during setup, can prevent the interface from being recognized.
- USB Port Issues: A faulty USB port or a port that doesn’t provide sufficient power can also cause the interface to be undetected.
- Software Conflicts: Other software, especially security programs or USB device management tools, might interfere with VCDS’s ability to access the USB interface.
- Firmware Problems: Although less common, a corrupted firmware on the VCDS interface itself could prevent it from being recognized by the software.
- Virtual Machine Issues: Running VCDS within a virtual machine environment can introduce complexities that lead to USB detection problems, as virtual environments may not fully support the necessary USB protocols.
Identifying the specific cause is the first step in effectively troubleshooting the “VCDS 16.8.0 Windows 7 USB interface not found” error. If you’re facing these issues, don’t hesitate to contact CAR-CODING.EDU.VN for expert remote assistance. We can help you quickly diagnose and resolve the problem, ensuring you can get back to coding and diagnostics without delay. Reach out via WhatsApp at +1 (641) 206-8880 or visit our website at CAR-CODING.EDU.VN for immediate support.
2. Initial Troubleshooting Steps for VCDS Interface Detection Issues
When facing the “VCDS 16.8.0 Windows 7 USB interface not found” error, begin with these initial troubleshooting steps to quickly identify and resolve common issues. First, ensure the VCDS software is correctly installed by downloading the latest version from the Ross-Tech website and reinstalling it. Next, check the USB connection by unplugging and re-plugging the interface, trying different USB ports, and verifying the cable’s integrity. Also, confirm that the VCDS interface is properly powered by connecting it to a vehicle with the ignition turned on. These fundamental checks often resolve simple connectivity issues, saving time and effort.
Here’s a more detailed breakdown of these initial steps:
- Verify VCDS Installation:
- Download the latest version of VCDS from Ross-Tech’s official website.
- Uninstall the existing version of VCDS from your computer.
- Reinstall VCDS, ensuring you follow all on-screen prompts and accept the terms of service.
- During installation, ensure that the option to install USB drivers for legacy interfaces is selected if you are using an older interface (HEX-USB, KEY-USB, KII-USB, Micro-CAN, or HEX+CAN).
- Check USB Connection:
- Unplug the VCDS interface from the USB port.
- Wait for 5-10 seconds.
- Plug the interface back into the USB port.
- Listen for the Windows “device connected” sound. If you don’t hear it, try a different USB port.
- If using a USB hub, connect the interface directly to a USB port on the computer to eliminate potential hub issues.
- Inspect the USB cable for any signs of damage. If possible, try a different USB cable to rule out cable defects.
- Confirm Interface Power:
- Connect the VCDS interface to the OBD-II port of a vehicle.
- Turn the vehicle’s ignition to the “ON” position (engine does not need to be running).
- This ensures the interface receives the necessary 12V power to function correctly.
By meticulously following these initial troubleshooting steps, technicians can often resolve common connectivity issues and ensure the VCDS interface is properly detected by Windows 7. If these steps don’t resolve the problem, more advanced troubleshooting may be required, and CAR-CODING.EDU.VN is ready to provide expert remote assistance. Contact us via WhatsApp at +1 (641) 206-8880 or visit CAR-CODING.EDU.VN to get immediate help.
 USB Driver Installation
3. Detailed USB Driver Configuration for Legacy VCDS Interfaces
For legacy VCDS interfaces (HEX-USB, KEY-USB, KII-USB, Micro-CAN, and HEX+CAN), proper USB driver configuration is essential for detection and functionality within Windows 7. First, ensure the correct drivers are installed during the VCDS setup process, specifically selecting the option to install USB drivers for legacy interfaces. If the drivers are not automatically installed, manually update them through Device Manager by locating the VCDS interface under “Other Devices,” right-clicking, and selecting “Update Driver Software.” Point the updater to the VCDS installation directory where the drivers are located. This manual driver update ensures the interface is correctly recognized and operational.
Here’s a more detailed guide to configuring USB drivers:
- Access Device Manager:
- Click the Start button.
- Right-click on “Computer” or “My Computer.”
- Select “Manage.”
- In the Computer Management window, click on “Device Manager” in the left pane.
- Locate the VCDS Interface:
- In Device Manager, look for the VCDS interface under the “Other Devices” category. It may appear as “Ross-Tech USB Interface” or a similar name with a yellow exclamation mark indicating a driver problem.
- Update Driver Software:
- Right-click on the VCDS interface device.
- Select “Update Driver Software.”
- Choose “Browse my computer for driver software.”
- Click “Browse” and navigate to the VCDS installation directory (usually
C:Ross-TechVCDS). - Make sure the “Include subfolders” option is checked so that Windows can find the driver files within the VCDS directory.
- Click “Next” to start the driver installation process.
- Follow On-Screen Prompts:
- Windows will attempt to install the driver. If prompted to install a driver that is not digitally signed, choose to proceed with the installation.
- Once the driver is successfully installed, you should see a message confirming that Windows has successfully updated your driver software.
- The VCDS interface should now appear under “Ports (COM & LPT)” or “Ross-Tech Direct USB Interface” in Device Manager without any yellow exclamation marks.
Proper driver configuration is crucial for ensuring seamless communication between the VCDS software and the interface. If you encounter any difficulties during this process or the interface is still not recognized, CAR-CODING.EDU.VN is available to provide expert remote assistance. Contact us via WhatsApp at +1 (641) 206-8880 or visit CAR-CODING.EDU.VN for immediate support and guidance.
4. Resolving VCDS Startup Issues Post-Update
Following a VCDS update, if the software fails to start, security software interference is a common cause. Ensure that antivirus programs or firewalls, such as Zone Alarm or Microsoft Security Essentials, are not blocking or quarantining the VCDS executable file. Add VCDS to the exception list within these programs to prevent them from interfering with its operation. Also, verify that the desktop shortcut points to the correct VCDS executable of the updated version. Addressing these potential conflicts allows VCDS to launch correctly and function as expected.
Here’s a detailed approach to resolving VCDS startup issues:
- Check Security Software:
- Open your antivirus or firewall software (e.g., Zone Alarm, Microsoft Security Essentials, BitDefender, McAfee).
- Look for the “Exceptions,” “Exclusions,” or “Allowed Programs” section.
- Add the VCDS executable (
VCDS.EXE) to the list of exceptions. This prevents the security software from scanning or blocking the program. - Also, add the entire VCDS installation folder to the exceptions list to ensure all related files are excluded.
- Verify Shortcut Integrity:
- Right-click on the VCDS desktop shortcut.
- Select “Properties.”
- In the “Shortcut” tab, check the “Target” field to ensure it points to the correct VCDS executable file. The path should reflect the location of the updated VCDS version (e.g.,
C:Ross-TechVCDSVCDS.EXE). - If the target is incorrect, update it to the correct path.
- Run as Administrator:
- Right-click on the VCDS desktop shortcut.
- Select “Properties.”
- Go to the “Compatibility” tab.
- Check the box that says “Run this program as an administrator.”
- Click “Apply” and then “OK.”
By carefully checking and configuring these settings, you can often resolve startup issues and ensure that VCDS runs smoothly after an update. If you continue to experience problems, CAR-CODING.EDU.VN is available to provide expert remote assistance. Contact us via WhatsApp at +1 (641) 206-8880 or visit CAR-CODING.EDU.VN for immediate support.
5. Testing and Firmware Updates: Ensuring Proper VCDS Functionality
To ensure proper VCDS functionality, testing the interface and updating the firmware are critical steps. After installation, a “First Use, No Config File” message may appear, which should be acknowledged. Then, in the Options menu, click “Test.” For a comprehensive test, the interface needs to be connected to a car with the key in the “ON” position to provide 12V power. If the test result indicates “Firmware Update Required,” click “Update” and allow the process to complete. Regularly updating the firmware ensures compatibility and optimal performance of the VCDS interface.
Here’s a detailed breakdown of testing and firmware update procedures:
- Initial Configuration:
- After installing VCDS, you may see a message stating “First Use, No Config File.” Acknowledge this message by clicking “OK.”
- Access Options Menu:
- Start the VCDS software.
- Click on the “Options” button on the main screen.
- Run Interface Test:
- In the Options window, click on the “Test” button.
- Connect to Vehicle:
- Connect the VCDS interface to the OBD-II port of a vehicle.
- Turn the vehicle’s ignition to the “ON” position (engine does not need to be running). This provides the necessary 12V power to the interface.
- Interpret Test Results:
- If the test is successful, you should see a message indicating that the interface is found and working correctly.
- If the test result shows “Firmware Update Required,” proceed to the next step.
- Update Firmware:
- Click on the “OK” button to close the test results window.
- Click on the “Update” button. The firmware update process will begin.
- Allow the update process to complete, which may take a few minutes. The software will count up to 100%.
- Once the update is complete, click “Close” and then “Save” in the Options window.
- Specific Instructions for HEX-NET and HEX-V2 Interfaces:
- These interfaces require an internet connection to update firmware.
- They do not need to remain connected to the car during the update process, but they must be plugged into a USB port for power.
- Use the “Config” button in VCDS to update the firmware, as explained in the Ross-Tech videos for HEX-NET and HEX-V2.
- Specific Instructions for Legacy Interfaces:
- Legacy interfaces (HEX-, Micro-, KII-, KEY-) do not require an internet connection to update firmware.
- They must remain connected to both the car and the USB port during the update process.
- Click “OK” and then “Update.” The software will count up to 100%. When finished, click “Close” and then “Save.”
By following these steps, you can ensure that your VCDS interface is functioning correctly and has the latest firmware, providing optimal performance and compatibility. If you encounter any issues during the testing or firmware update process, CAR-CODING.EDU.VN is available to provide expert remote assistance. Contact us via WhatsApp at +1 (641) 206-8880 or visit CAR-CODING.EDU.VN for immediate support.
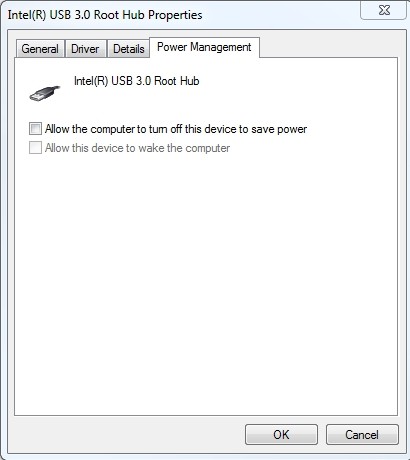
6. Advanced Troubleshooting: Windows Power Management and Permissions
Advanced troubleshooting for VCDS interface issues involves checking Windows power management settings and ensuring proper permissions. Windows power management may turn off USB ports to save power, causing VCDS interface disconnection. To prevent this, go to Device Manager, expand “Universal Serial Bus Controllers,” right-click “USB Root Hub,” select “Properties,” go to the “Power Management” tab, and uncheck “Allow Windows to turn off this device to save power.” Also, ensure the user account has write permissions to the VCDS installation folder; if necessary, reinstall VCDS in the Documents folder. Running the software as an administrator can also resolve permission-related issues.
Here’s a more detailed guide to these advanced troubleshooting steps:
- Disable USB Selective Suspend:
- Open Control Panel.
- Go to “Hardware and Sound” and then “Power Options.”
- Click “Change plan settings” next to your current power plan.
- Click “Change advanced power settings.”
- Expand “USB settings” and then “USB selective suspend setting.”
- Set both “On battery” and “Plugged in” to “Disabled.”
- Click “Apply” and then “OK.”
- Adjust USB Root Hub Power Management:
- Open Device Manager (as described in Section 3).
- Expand “Universal Serial Bus controllers.”
- Right-click on each “USB Root Hub” entry and select “Properties.”
- Go to the “Power Management” tab.
- Uncheck the box that says “Allow the computer to turn off this device to save power.”
- Click “OK.” Repeat this process for all USB Root Hub entries.
- Verify File Permissions:
- Navigate to the VCDS installation folder (usually
C:Ross-TechVCDS). - Right-click on the VCDS folder and select “Properties.”
- Go to the “Security” tab.
- Select your user account from the list of users and groups.
- Ensure that your user account has “Write” permissions. If not, click “Edit,” select your user account, and check the “Write” box under “Allow.”
- Click “Apply” and then “OK.”
- Navigate to the VCDS installation folder (usually
- Run as Administrator:
- Right-click on the VCDS desktop shortcut.
- Select “Properties.”
- Go to the “Compatibility” tab.
- Check the box that says “Run this program as an administrator.”
- Click “Apply” and then “OK.”
Adjusting these settings can resolve issues related to USB port power management and file permissions, ensuring that VCDS has the necessary access to function correctly. If these steps don’t resolve the problem, CAR-CODING.EDU.VN is available to provide expert remote assistance. Contact us via WhatsApp at +1 (641) 206-8880 or visit CAR-CODING.EDU.VN for immediate support.
7. Potential Conflicts with Security Software and Other Applications
Potential conflicts with security software and other applications can significantly disrupt VCDS functionality. Security software like antivirus programs and firewalls may mistakenly flag VCDS as a threat, blocking its operation. Other applications, especially those that access USB devices or diagnostic ports, can also interfere with VCDS. Identify and resolve these conflicts by adding VCDS to the exception lists of security software and closing any conflicting applications before running VCDS. This ensures VCDS has the necessary resources and access to function correctly.
Here’s a detailed approach to identifying and resolving these conflicts:
- Identify Conflicting Software:
- Security Software: Antivirus programs (e.g., Microsoft Security Essentials, BitDefender, McAfee) and firewalls often interfere with VCDS.
- USB Device Management Tools: Software that manages USB devices, such as HID utilities for add-on mice or keyboards, can conflict with VCDS.
- Diagnostic Port Applications: Other applications that access the diagnostic port, such as GPS trackers or add-on gauges like Polar FIS, can prevent VCDS from communicating with the vehicle.
- Remote Access Tools: Citrix apps or other remote access tools may have settings that interfere with VCDS.
- Resolve Conflicts with Security Software:
- Open your antivirus or firewall software.
- Look for the “Exceptions,” “Exclusions,” or “Allowed Programs” section.
- Add the VCDS executable (
VCDS.EXE) and the entire VCDS installation folder to the list of exceptions. - Restart your computer to ensure the changes take effect.
- Close Conflicting Applications:
- Before running VCDS, close any applications that may be conflicting with it. This includes:
- USB device management tools
- Diagnostic port applications
- Remote access tools
- Use Task Manager (Ctrl+Shift+Esc) to identify and close any background processes that may be interfering with VCDS.
- Before running VCDS, close any applications that may be conflicting with it. This includes:
- Disable Conflicting Services:
- Press Win+R to open the Run dialog.
- Type
msconfigand press Enter. - In the System Configuration window, go to the “Services” tab.
- Check the box that says “Hide all Microsoft services.”
- Review the remaining services and uncheck any that may be related to conflicting software.
- Click “Apply” and then “OK.”
- Restart your computer.
- Check Startup Programs:
- Open Task Manager (Ctrl+Shift+Esc).
- Go to the “Startup” tab.
- Disable any startup programs that may be related to conflicting software.
- Restart your computer.
By identifying and resolving conflicts with security software and other applications, you can ensure that VCDS has the necessary resources and access to function correctly. If these steps don’t resolve the problem, CAR-CODING.EDU.VN is available to provide expert remote assistance. Contact us via WhatsApp at +1 (641) 206-8880 or visit CAR-CODING.EDU.VN for immediate support.
8. Addressing Virtualized OS and Diagnostic Port Conflicts
When using VCDS, it’s important to address issues related to virtualized operating systems and diagnostic port conflicts. Virtualized OS, such as Parallels or Virtual PC, are not officially supported by Ross-Tech due to potential USB communication and driver compatibility issues. If you encounter problems in a virtual environment, using a native Windows PC is recommended. Additionally, ensure that the diagnostic port is exclusively used by VCDS, and remove any other devices like GPS trackers or add-on gauges that might interfere with VCDS communication.
Here’s a more detailed breakdown of addressing these conflicts:
- Virtualized Operating Systems:
- Recommendation: Ross-Tech does not officially support the use of VCDS in virtualized operating systems like Parallels or Virtual PC. These environments can introduce complexities that lead to USB detection and communication problems.
- Alternative: If you are experiencing issues with VCDS in a virtualized OS, the recommended solution is to use a native Windows PC. This ensures that VCDS has direct access to the hardware and avoids potential compatibility issues.
- Boot Camp: If you are using a Mac, running Windows through Boot Camp is a viable alternative, as it allows Windows to run natively on the hardware.
- Diagnostic Port Conflicts:
- Exclusive Access: VCDS requires exclusive access to the diagnostic port in order to communicate with the vehicle.
- Conflicting Devices: Other devices connected to the diagnostic port, such as GPS trackers or add-on gauges (e.g., Polar FIS), can interfere with VCDS communication.
- Troubleshooting:
- Disconnect any devices connected to the diagnostic port before using VCDS.
- Ensure that VCDS is the only application attempting to access the diagnostic port.
- Check for any hidden GPS trackers or other devices that may be connected to the diagnostic port without your knowledge.
By addressing issues related to virtualized operating systems and diagnostic port conflicts, you can ensure that VCDS has the necessary resources and access to function correctly. If these steps don’t resolve the problem, CAR-CODING.EDU.VN is available to provide expert remote assistance. Contact us via WhatsApp at +1 (641) 206-8880 or visit CAR-CODING.EDU.VN for immediate support.
9. Windows 10/11 Specific Solutions for VCDS Interface Problems
Windows 10 and 11 may present specific challenges for VCDS interface functionality. One common issue in Windows 10 is “Error 39,” which can be addressed by following the solutions provided in Ross-Tech’s forum posts. Additionally, disabling Cortana in Windows 10 has been reported to resolve interface detection problems. In Windows 11, driver loading issues can often be fixed by disabling “Memory integrity” in the Core Isolation settings under Windows Security. These OS-specific adjustments can ensure VCDS operates smoothly on newer Windows platforms.
Here’s a more detailed guide to resolving these Windows-specific issues:
- Windows 10 – Error 39:
- Cause: Error 39 in Windows 10 typically indicates a driver issue.
- Solution: Refer to the Ross-Tech forum posts for detailed troubleshooting steps:
- Post #30
- Post #31
- General Steps:
- Uninstall the VCDS USB driver from Device Manager.
- Download the latest VCDS software from Ross-Tech’s website.
- Reinstall VCDS, ensuring that the USB driver is installed correctly.
- Restart your computer.
- Windows 10 – Cortana Interference:
- Cause: Cortana, the virtual assistant in Windows 10, has been reported to interfere with VCDS interface detection.
- Solution:
- Disable Cortana:
- Open the Registry Editor (regedit).
- Navigate to
HKEY_LOCAL_MACHINESOFTWAREPoliciesMicrosoftWindowsWindows Search. - Create a new DWORD (32-bit) Value named
AllowCortanaand set its value to0.
- Disable the Cortana service:
- Open the Services app (services.msc).
- Find the “Cortana” service (if it exists).
- Right-click on the service and select “Properties.”
- Set the “Startup type” to “Disabled.”
- Click “Apply” and then “OK.”
- Manually restart the HID service:
- In the Services app, find the “Human Interface Device Service.”
- Right-click on the service and select “Restart.”
- Restart your computer.
- Disable Cortana:
- Windows 11 – Memory Integrity:
- Cause: The “Memory integrity” feature in Windows 11 can prevent VCDS drivers from loading correctly.
- Solution:
- Disable “Memory integrity”:
- Open the Settings app.
- Go to “Privacy & Security” and then “Windows Security.”
- Click on “Device Security.”
- Click on “Core Isolation.”
- Toggle the “Memory integrity” setting to “Off.”
- Restart your computer.
- Disable “Memory integrity”:
- Additional Tips:
- Ensure that you are using the latest version of VCDS.
- Run VCDS as an administrator.
- Disable any conflicting software or services.
- Check the Ross-Tech forums for any known issues or solutions specific to your version of Windows and VCDS.
By addressing these Windows 10 and 11 specific issues, you can ensure that your VCDS interface functions correctly. If these steps don’t resolve the problem, CAR-CODING.EDU.VN is available to provide expert remote assistance. Contact us via WhatsApp at +1 (641) 206-8880 or visit CAR-CODING.EDU.VN for immediate support.
10. When to Seek Expert Remote Support for VCDS Issues?
Knowing when to seek expert remote support for VCDS issues can save time and prevent potential damage to vehicle systems. If basic troubleshooting steps—such as checking connections, updating drivers, and resolving software conflicts—do not resolve the problem, or if you are uncomfortable making changes to system settings, it’s time to seek professional help. Complex issues, such as ECU programming errors, can be efficiently resolved with remote assistance, ensuring safe and accurate modifications.
Here’s a detailed guide to help you determine when to seek expert remote support:
- Unresolved Basic Troubleshooting:
- If you have tried the basic troubleshooting steps (e.g., checking connections, updating drivers, resolving software conflicts) and the issue persists, it’s time to seek expert help.
- Complex Error Messages:
- If you encounter complex error messages that you don’t understand or cannot resolve on your own, professional assistance is recommended.
- ECU Programming Errors:
- If you experience errors during ECU programming or flashing, it’s crucial to seek expert support to avoid damaging the ECU.
- Unfamiliar System Settings:
- If you are uncomfortable making changes to system settings or are unsure about the potential consequences, it’s best to seek professional help.
- Time Constraints:
- If you have limited time to troubleshoot the issue, seeking expert remote support can save you valuable time and effort.
- Preventing Potential Damage:
- If you are concerned about potentially damaging vehicle systems while troubleshooting, seeking expert help can ensure safe and accurate modifications.
- Specific Scenarios:
- VCDS Interface Not Detected: If your VCDS interface is not being detected by the software, even after trying the basic troubleshooting steps.
- Firmware Update Failures: If you encounter errors during firmware updates.
- Communication Errors: If you experience communication errors between VCDS and the vehicle.
- Coding Issues: If you are having trouble with coding or adaptations.
- Fault Code Problems: If you are unable to clear fault codes or are experiencing recurring fault codes.
By recognizing when to seek expert remote support, you can ensure that VCDS issues are resolved efficiently and safely. CAR-CODING.EDU.VN is available to provide expert remote assistance. Contact us via WhatsApp at +1 (641) 206-8880 or visit CAR-CODING.EDU.VN for immediate support.
11. Benefits of Remote VCDS Support from CAR-CODING.EDU.VN
Remote VCDS support from CAR-CODING.EDU.VN offers numerous benefits, including expert assistance, time savings, cost-effectiveness, and safety. Our experienced technicians provide step-by-step guidance, ensuring accurate and safe coding and programming. Remote support eliminates the need for costly on-site visits, saving time and money. We offer support for a wide range of car brands and models, ensuring comprehensive coverage for all your VCDS needs.
Here’s a detailed breakdown of the benefits of remote VCDS support:
- Expert Assistance:
- Access to experienced technicians with in-depth knowledge of VCDS and vehicle systems.
- Step-by-step guidance to ensure accurate and safe coding and programming.
- Assistance with complex error messages and troubleshooting.
- Time Savings:
- Remote support eliminates the need for time-consuming on-site visits.
- Quick resolution of issues, minimizing downtime.
- Assistance is available when you need it, allowing you to continue working on your vehicle without delay.
- Cost-Effectiveness:
- Remote support is more affordable than on-site visits.
- No travel costs or expenses.
- Reduced downtime translates to cost savings.
- Safety:
- Expert guidance ensures safe modifications to vehicle systems.
- Reduced risk of damaging the ECU or other components.
- Proper coding and programming to maintain vehicle performance and reliability.
- Wide Range of Support:
- Support for a wide range of car brands and models, including VW, Audi, BMW, Mercedes-Benz, and more.
- Assistance with various VCDS functions, including coding, adaptations, fault code clearing, and more.
- Convenience:
- Remote support can be accessed from anywhere with an internet connection.
- Flexible scheduling to fit your needs.
- No need to transport your vehicle to a service center.
- Real-Time Assistance:
- Real-time support ensures that you get immediate help when you need it.
- Technicians can remotely access your computer to diagnose and resolve issues.
- Interactive guidance to help you understand the process and learn new skills.
By choosing remote VCDS support from CAR-CODING.EDU.VN, you can enjoy these benefits and ensure that your VCDS issues are resolved efficiently and safely. Contact us via WhatsApp at +1 (641) 206-8880 or visit CAR-CODING.EDU.VN for immediate support.
12. Common VCDS Coding Issues We Can Help You Resolve
CAR-CODING.EDU.VN can assist with a wide range of common VCDS coding issues. We can help activate hidden features, such as cornering lights, comfort window operation, and gauge staging. Our experts can resolve diagnostic trouble codes (DTCs), perform ECU adaptations, and adjust module settings. Additionally, we provide support for immobilizer coding, key programming, and retrofitting options. Our comprehensive VCDS support ensures efficient and accurate vehicle modifications.
Here’s a detailed list of common VCDS coding issues we can help you resolve:
- Activating Hidden Features:
- Cornering Lights: Enable cornering lights for improved visibility during turns.
- Comfort Window Operation: Enable remote window control via the key fob.
- Gauge Staging: Activate gauge staging (needle sweep) on startup.
- Coming Home/Leaving Home Lights: Configure automatic headlight activation.
- Emergency Brake Flashing: Enable emergency brake flashing for increased safety.
- Seat Belt Warning: Disable or adjust the seat belt warning chime.
- Rain Closing: Automatically close windows and sunroof when it rains.
- Diagnostic Trouble Codes (DTCs):
- Reading and clearing DTCs.
- Diagnosing and resolving recurring DTCs.
- Identifying the root cause of DTCs.
- ECU Adaptations:
- Throttle Body Adaptation: Perform throttle body adaptation for smooth engine performance.
- Transmission Adaptation: Adapt the transmission for optimal shifting.
- Engine Adaptation: Adjust engine parameters for improved performance.
- Module Settings:
- Adjusting module settings for various vehicle systems.
- Customizing vehicle behavior through module coding.
- Immobilizer Coding:
- Immobilizer coding for key programming.
- Troubleshooting immobilizer issues.
- Key Programming:
- Programming new keys for your vehicle.
- Deleting lost or stolen keys.
- Retrofitting Options:
- Retrofitting options for adding new features to your vehicle.
- Coding and adapting retrofitted components.
- Fault Code Clearing:
- Clearing fault codes from various modules.
- Ensuring fault codes are cleared properly and do not return.
- ABS Coding:
- Coding ABS modules for optimal performance.
- Troubleshooting ABS-related issues.
- Airbag Coding:
- Coding airbag modules for safety and functionality.