Is your VCDS 16.8.0 USB interface not being recognized by Windows 7? CAR-CODING.EDU.VN understands the frustrations of dealing with VCDS interface connectivity issues, especially when you need to diagnose or code a vehicle. We offer remote automotive coding support, ECU programming, and can help resolve VCDS connection problems efficiently.
Contents
- 1. What Causes VCDS 16.8.0 USB Interface Not Found Error in Windows 7?
- 2. How Do I Download and Install VCDS Release 16.8.0?
- 3. How Do I Correctly Install USB Drivers for VCDS 16.8.0 on Windows 7?
- 3.1. Identify Your Interface Type
- 3.2. Automatic Driver Installation
- 3.3. Manual Driver Installation
- 3.4. Troubleshooting Driver Installation
- 3.5. Verifying Driver Installation
- 4. How Can I Resolve VCDS 16.8.0 Not Starting After Updating?
- 5. How Do I Test My VCDS 16.8.0 Interface After Installation?
- 6. What Should I Do If VCDS Shows “Firmware Update Required”?
- 7. What Do I Do If All Buttons in VCDS Are Unavailable?
- 8. How Do I Prevent Windows From Turning Off USB Ports?
- 9. What Permissions Are Required to Run VCDS Correctly?
- 10. How to Address Slow Performance of VCDS After Updates?
- 11. What Software Conflicts Can Cause Issues With VCDS?
- 12. Is It Necessary to Perform a Registry Scan and DLL Cleanup for VCDS?
- 13. Is VCDS Compatible With Virtualized Operating Systems?
- 14. What External Devices Can Interfere With VCDS?
- 15. How to Handle Error 39 in Windows 10 With VCDS?
- 16. How Can Disabling Cortana Help With VCDS Interface Recognition?
- 17. How Does Memory Integrity in Windows 11 Affect VCDS?
- 18. What Is The Significance of Rebooting the PC With the HEX-V2 Plugged In?
- 19. How CAR-CODING.EDU.VN Can Help You With VCDS Issues?
- 20. FAQ About VCDS and Interface Issues
1. What Causes VCDS 16.8.0 USB Interface Not Found Error in Windows 7?
The dreaded “VCDS 16.8.0 USB interface not found” error in Windows 7 can stem from a variety of issues, from driver problems to software conflicts. This issue arises because the computer is unable to properly communicate with the VCDS interface device.
Several factors contribute to this error:
- Incorrect or Corrupted USB Drivers: The USB drivers act as the translator between your VCDS interface and your Windows 7 operating system. If these drivers are outdated, corrupted, or incorrectly installed, communication breaks down.
- Compatibility Issues: While VCDS 16.8.0 was designed to work with Windows 7, there might be underlying compatibility issues if your operating system isn’t fully updated or if certain system settings are interfering.
- USB Port Problems: A faulty USB port can prevent the interface from being recognized.
- Conflicting Software: Sometimes, other software installed on your computer, such as antivirus programs or virtual machine software, can interfere with the VCDS software and its ability to detect the interface.
- Interface Configuration Issues: There might be a configuration problem within the VCDS software itself, preventing it from properly recognizing the connected interface.
- Damaged USB Cable: A damaged USB cable can interrupt the data flow between the interface and the computer.
- Outdated VCDS Software: Although you’re using version 16.8.0, there might be critical updates or patches that address USB connectivity issues.
- Hardware Malfunction: In rare cases, the VCDS interface itself might be faulty.
Understanding the root cause is crucial for effectively troubleshooting the issue. Let’s move onto practical solutions.
2. How Do I Download and Install VCDS Release 16.8.0?
Downloading and installing VCDS Release 16.8.0 correctly is essential for avoiding initial setup issues. Properly installing the VCDS software can ensure all necessary files and drivers are correctly placed on your system, reducing the likelihood of the “USB interface not found” error.
Here’s a step-by-step guide:
-
Download the Software:
- Visit the official Ross-Tech website to find the download section.
- Locate VCDS Release 16.8.0 (or the latest compatible version for your interface) and download the installer.
-
Run the Installer:
- Locate the downloaded installer file (usually a .exe file) and double-click it to begin the installation process.
- Follow the on-screen prompts.
-
Accept the Terms and Conditions:
- Read the license agreement carefully.
- If you agree, accept the terms and conditions to proceed with the installation.
-
Choose Installation Location:
- The installer will suggest a default installation location (usually in the Program Files directory).
- Unless you have a specific reason to change it, it’s best to keep the default location.
-
Select Components to Install:
- During the installation, you’ll be presented with a list of components to install.
- For legacy interfaces (HEX-USB, KEY-USB, KII-USB, Micro-CAN, and HEX+CAN), make sure the box for “Install USB Drivers for Legacy Interfaces” is checked.
- For current interfaces (HEX-NET or HEX-V2), this box should be unchecked as they don’t require USB drivers.
-
Install USB Drivers (If Applicable):
- If you selected to install USB drivers for legacy interfaces, the installer will prompt you to install them at the end of the installation.
- Allow the driver installation to complete.
-
Complete the Installation:
- Once all components and drivers are installed, the installer will display a completion message.
- Click “Finish” to exit the installer.
-
Restart Your Computer (If Prompted):
- In some cases, the installer might prompt you to restart your computer to complete the installation.
- If prompted, restart your computer.
Important Considerations:
- Run as Administrator: Right-click on the installer file and select “Run as administrator” to ensure the installer has the necessary permissions to install all components correctly.
- Disable Antivirus Software: Temporarily disable your antivirus software during the installation process. Some antivirus programs can interfere with the installation of drivers and other components.
- Check for Updates: After the installation, check the Ross-Tech website for any updates or patches to VCDS Release 16.8.0. Installing these updates can resolve compatibility issues and improve performance.
3. How Do I Correctly Install USB Drivers for VCDS 16.8.0 on Windows 7?
Correctly installing USB drivers is critical for your VCDS 16.8.0 interface to communicate with your Windows 7 computer. If the drivers are not installed properly, the interface will not be recognized, leading to the “USB interface not found” error.
3.1. Identify Your Interface Type
Before installing drivers, determine if you have a legacy interface (HEX-USB, KEY-USB, KII-USB, Micro-CAN, and HEX+CAN) or a current interface (HEX-NET or HEX-V2). Legacy interfaces require USB drivers, while current interfaces do not.
3.2. Automatic Driver Installation
- Plug in the Interface: Connect your VCDS interface to a USB port on your computer.
- Windows Driver Installation: Windows 7 should automatically detect the new hardware and attempt to install the drivers.
- Follow the Prompts: If a USB Driver Installation Wizard appears, follow the on-screen instructions.
- Completion: Once the driver installation is complete, you should see a message indicating that the device is ready to use.
3.3. Manual Driver Installation
If the automatic driver installation fails, you can manually install the drivers.
- Download Drivers: Download the latest USB drivers for your VCDS interface from the Ross-Tech website.
- Extract the Drivers: Extract the downloaded driver files to a folder on your computer.
- Open Device Manager:
- Click the Start button.
- Right-click on “Computer” and select “Manage.”
- In the Computer Management window, select “Device Manager.”
- Locate the Interface: In Device Manager, look for a device listed under “Other devices” or “Unknown devices.” It might be labeled as “Ross-Tech” or “VCDS.”
- Update Driver Software:
- Right-click on the unknown device and select “Update Driver Software.”
- Choose “Browse my computer for driver software.”
- Browse to the folder where you extracted the driver files.
- Make sure the “Include subfolders” option is checked.
- Click “Next” to install the driver.
- Ignore Warnings: If Windows displays a warning message about the driver not being signed, click “Install this driver software anyway.”
- Completion: Once the driver installation is complete, you should see a message indicating that the device is ready to use.
3.4. Troubleshooting Driver Installation
If you encounter issues during driver installation, try the following:
- Run as Administrator: Make sure you are logged in as an administrator or have administrator privileges when installing the drivers.
- Disable Antivirus Software: Temporarily disable your antivirus software, as it can sometimes interfere with driver installation.
- Check USB Port: Try using a different USB port on your computer.
- Restart Computer: Restart your computer after installing the drivers.
- Driver Conflicts: If you have previously installed VCDS drivers, they might be conflicting with the new drivers. Uninstall the old drivers before installing the new ones.
3.5. Verifying Driver Installation
After installing the drivers, verify that they are installed correctly.
- Open Device Manager: Follow the steps above to open Device Manager.
- Locate the Interface: In Device Manager, expand the “Universal Serial Bus controllers” section.
- Check for Ross-Tech Device: You should see your VCDS interface listed as “Ross-Tech” or “VCDS.” If there is a yellow exclamation mark next to the device, it indicates a problem with the driver.
- Driver Properties: Right-click on the VCDS interface and select “Properties.” In the Properties window, go to the “Driver” tab.
- Driver Details: Check the driver details to ensure that the correct drivers are installed and that they are functioning properly.
By following these steps, you can correctly install the USB drivers for your VCDS 16.8.0 interface on Windows 7, resolving the “USB interface not found” error and ensuring proper communication between the interface and your computer.
4. How Can I Resolve VCDS 16.8.0 Not Starting After Updating?
If VCDS 16.8.0 won’t start after an update, it’s a common issue that can usually be resolved with a few troubleshooting steps.
- Check Antivirus and Firewall:
- Antivirus programs or firewalls can sometimes block VCDS from starting, especially after an update.
- Make sure that Zone Alarm or your virus scanner are not blocking or quarantining the VCDS.exe file.
- Add VCDS to the exception list in your antivirus software and firewall.
- Verify Installation:
- Ensure that the update was installed correctly.
- Go to the installation directory of VCDS and check if the VCDS.exe file is the updated version (16.8.0).
- If the installation was incomplete, reinstall VCDS from scratch.
- Check Shortcut:
- Verify that the shortcut on your desktop points to the correct VCDS.exe file.
- Sometimes, the shortcut might be pointing to an older version of the program.
- Delete the old shortcut and create a new one from the VCDS installation directory.
- Run as Administrator:
- Right-click on the VCDS.exe file and select “Run as administrator.”
- This can help bypass permission issues that might be preventing VCDS from starting.
- Compatibility Mode:
- Right-click on the VCDS.exe file and select “Properties.”
- Go to the “Compatibility” tab.
- Check the box that says “Run this program in compatibility mode for:” and select “Windows 7” from the dropdown menu.
- Click “Apply” and then “OK.”
- Reinstall VCDS:
- If none of the above steps work, try reinstalling VCDS.
- Uninstall VCDS from your computer.
- Download the latest version of VCDS from the Ross-Tech website.
- Install VCDS following the instructions provided earlier.
- Check for Conflicting Software:
- Some software can conflict with VCDS and prevent it from starting.
- Close any unnecessary programs running in the background.
- If you suspect a specific program is causing the issue, try uninstalling it and see if VCDS starts.
- System Restore:
- If you recently made changes to your system, such as installing new software or updating drivers, try performing a system restore.
- This will revert your system to a previous state when VCDS was working correctly.
- Check Event Viewer:
- Check the Windows Event Viewer for any error messages related to VCDS.
- This can provide valuable information about the cause of the issue.
- To open Event Viewer, go to Control Panel > System and Security > Administrative Tools and double-click on “Event Viewer.”
5. How Do I Test My VCDS 16.8.0 Interface After Installation?
After installing or updating VCDS 16.8.0, it’s crucial to test the interface to ensure it’s communicating correctly with your vehicle and the software. A successful test confirms that the drivers are properly installed and that the interface is ready for diagnostics and coding.
- Connect the Interface to Your Computer: Plug your VCDS interface into a USB port on your computer.
- Connect to a Vehicle: Connect the other end of the interface to the OBD-II port of your vehicle. Make sure the vehicle’s ignition is turned ON. It doesn’t matter if it’s a VW/Audi, just something with an OBD-2 port with the key ON.
- Start VCDS Software: Launch the VCDS software on your computer.
- Go to Options: In the VCDS main screen, click on the “Options” button.
- Select the Correct Port: In the Options screen, make sure the correct COM port is selected for your interface. If you’re using a USB interface, it should be automatically detected.
- Test the Interface: Click on the “Test” button. VCDS will attempt to communicate with the interface.
- Check the Results: After the test, VCDS will display the results.
- Interface: Found!: This indicates that VCDS has successfully detected the interface.
- Type: This shows the type of interface you’re using (e.g., HEX-NET, HEX-V2, HEX-USB).
- Status: Okay or Firmware Update Required: If the status is “Okay,” the interface is functioning correctly. If it says “Firmware Update Required,” proceed to update the firmware.
- Update Firmware (If Required): If the test result shows “Firmware Update Required,” click “OK” then “Update.” The software will guide you through the firmware update process.
- HEX-NET or HEX-V2 interfaces need Internet access to update but do not need to remain connected to the car, just plugged in via USB. Use the Config button to update firmware.
- Legacy dongle HEX-, Micro-, KII-, KEY- interfaces do not need Internet access to update but DO need to remain connected to both the car and USB. Click OK then Update.
- Save the Settings: After the test and firmware update (if any), click “Save” to save the settings.
- Communicate with the Car: To further verify the interface, try communicating with the car.
- Click on “Select.”
- Choose a control module (e.g., 01-Engine).
- Click on “Fault Codes – 02.”
- If VCDS can successfully retrieve fault codes from the car, the interface is working correctly.
If the test fails, consider these points:
- Interface Not Found: If VCDS cannot find the interface, make sure the USB drivers are installed correctly, the interface is properly connected, and the COM port is correctly selected.
- Communication Errors: If VCDS can find the interface but cannot communicate with the car, check the vehicle’s OBD-II port, the interface cable, and the vehicle’s ignition.
- Firmware Issues: If the firmware update fails, try again or contact Ross-Tech support for assistance.
6. What Should I Do If VCDS Shows “Firmware Update Required”?
Seeing the “Firmware Update Required” message in VCDS means your interface’s firmware is outdated and needs to be updated for optimal performance and compatibility. Keeping your interface’s firmware up-to-date ensures that it works correctly with the latest versions of VCDS and supports newer vehicle models.
Here’s how to handle it:
- Connect the Interface: Ensure your VCDS interface is connected to your computer via USB. For HEX-NET or HEX-V2 interfaces, connecting to the car is not necessary during the firmware update process. For legacy interfaces (HEX-USB, KEY-USB, KII-USB, Micro-CAN, and HEX+CAN), ensure the interface remains connected to both the car (with the ignition ON) and the USB.
- Start VCDS: Launch the VCDS software on your computer.
- Go to Options: In the VCDS main screen, click on the “Options” button.
- Test the Interface: Click on the “Test” button. If the test result shows “Firmware Update Required,” proceed to the next step.
- Start the Firmware Update:
- For HEX-NET or HEX-V2 interfaces, click the “Config” button. The software will guide you through the firmware update process. These interfaces need Internet access to update but do not need to remain connected to the car, just plugged in via USB.
- For legacy interfaces, click “OK” then “Update.” These interfaces do not need Internet access to update but DO need to remain connected to both the car and USB.
- Follow the On-Screen Instructions: The software will display instructions on how to proceed with the firmware update. Follow these instructions carefully.
- Wait for the Update to Complete: The firmware update process may take several minutes. Do not disconnect the interface or turn off your computer during the update.
- Check the Progress: The software will display a progress bar indicating the status of the firmware update. It should count up to 100%.
- Completion Message: Once the firmware update is complete, the software will display a message indicating that the update was successful.
- Save the Settings: Click “Close” then “Save” in the Options screen to save the settings.
- Retest the Interface: After the firmware update, retest the interface to ensure that it is functioning correctly.
7. What Do I Do If All Buttons in VCDS Are Unavailable?
If all the buttons in VCDS are grayed out or unavailable, it typically indicates that the software is not properly communicating with the interface or the vehicle. This issue can arise from several factors, preventing you from accessing the diagnostic and coding functions of VCDS.
- Check Interface Connection: Make sure your VCDS interface is properly connected to your computer via USB and to the vehicle’s OBD-II port. Ensure that the vehicle’s ignition is turned ON.
- Test the Interface:
- Go to the “Options” screen in VCDS.
- Click the “Test” button to check if VCDS can detect the interface.
- If the test fails, there may be an issue with the USB drivers or the interface itself.
- USB Driver Issues: If the interface is not detected, reinstall or update the USB drivers for your VCDS interface. Refer to the section on installing USB drivers earlier in this article.
- Firmware Update: If the test indicates that a firmware update is required, proceed with the firmware update process as described in the previous section.
- Software Activation: Ensure that your VCDS software is properly activated. If the software is not activated, some or all of the buttons may be unavailable.
- Check for Error Messages: Look for any error messages displayed in VCDS. These messages can provide clues about the cause of the issue.
- Conflicting Software: Some software can conflict with VCDS and prevent it from functioning correctly. Close any unnecessary programs running in the background.
- Administrator Privileges: Run VCDS as an administrator. Right-click on the VCDS.exe file and select “Run as administrator.”
- Compatibility Mode: Try running VCDS in compatibility mode for Windows 7. Right-click on the VCDS.exe file, select “Properties,” go to the “Compatibility” tab, and check the box that says “Run this program in compatibility mode for.”
- Reinstall VCDS: If none of the above steps work, try reinstalling VCDS. Uninstall the software, download the latest version from the Ross-Tech website, and reinstall it.
8. How Do I Prevent Windows From Turning Off USB Ports?
Windows power management settings can sometimes cause USB ports to turn off to save power, which can interrupt communication with your VCDS interface. Preventing Windows from turning off USB ports ensures a stable connection during diagnostics and coding.
- Open Device Manager:
- Click the Start button.
- Right-click on “Computer” and select “Manage.”
- In the Computer Management window, select “Device Manager.”
- Expand Universal Serial Bus Controllers: In Device Manager, expand the “Universal Serial Bus controllers” section.
- Locate USB Root Hub: Look for entries labeled “USB Root Hub.” There may be multiple entries.
- Open Properties: Right-click on each “USB Root Hub” entry and select “Properties.”
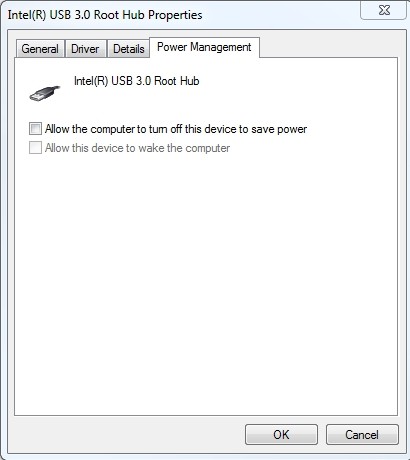 USB Root Hub Power Management Tab
 - Go to Power Management Tab: In the Properties window, go to the “Power Management” tab.
- Uncheck “Allow the Computer to Turn Off This Device to Save Power”: Uncheck the box that says “Allow the computer to turn off this device to save power.”
- Apply Changes: Click “OK” to save the changes.
- Repeat for All USB Root Hubs: Repeat steps 4-7 for all “USB Root Hub” entries in Device Manager.
- Restart Your Computer: Restart your computer to ensure the changes take effect.
By following these steps, you can prevent Windows from turning off USB ports, ensuring a stable connection with your VCDS interface and preventing communication interruptions during diagnostics and coding.
9. What Permissions Are Required to Run VCDS Correctly?
Proper permissions are essential for VCDS to function correctly. If VCDS does not have the necessary permissions, it may not be able to access files, drivers, or hardware resources, leading to errors and malfunctions.
- Run as Administrator: Always run VCDS as an administrator. Right-click on the VCDS.exe file and select “Run as administrator.” This gives VCDS the necessary privileges to access system resources and make changes.
- Install VCDS in a Suitable Location: Install VCDS in a location where you have full read and write permissions. Avoid installing it in protected system folders like “Program Files” or “Windows.” A suitable location is often the “Documents” folder.
- Check User Account Control (UAC) Settings: User Account Control (UAC) can sometimes interfere with VCDS. Lowering the UAC settings or adding VCDS to the list of exceptions can help.
- Antivirus and Firewall Exceptions: Add VCDS to the list of exceptions in your antivirus software and firewall. This prevents these programs from blocking or interfering with VCDS.
- File Permissions: Ensure that the VCDS installation folder and all its files have the necessary permissions.
- Registry Permissions: In some cases, VCDS may require access to certain registry keys.
10. How to Address Slow Performance of VCDS After Updates?
Experiencing slow performance with VCDS after updates can be frustrating, but it’s often due to software conflicts or resource constraints. Addressing slow performance ensures that VCDS runs smoothly, allowing you to perform diagnostics and coding efficiently.
- Check Antivirus Software: Some antivirus programs, like Microsoft Security Essentials, can cause VCDS to run slowly after updates. Add VCDS to the exception list in your antivirus software to prevent it from scanning VCDS files.
- Close Unnecessary Programs: Close any unnecessary programs running in the background to free up system resources.
- Update Drivers: Make sure your computer’s drivers, especially graphics card drivers, are up to date. Outdated drivers can cause performance issues.
- Defragment Your Hard Drive: Fragmented hard drives can slow down your computer’s performance. Defragment your hard drive to improve performance.
- Check System Resources: Check your computer’s CPU and memory usage while running VCDS. If your system is running out of resources, consider upgrading your hardware.
- Disable Visual Effects: Disable unnecessary visual effects in Windows to improve performance.
- Reinstall VCDS: If none of the above steps work, try reinstalling VCDS. Uninstall the software, download the latest version from the Ross-Tech website, and reinstall it.
11. What Software Conflicts Can Cause Issues With VCDS?
Software conflicts can significantly impact VCDS performance and functionality. Identifying and resolving these conflicts is essential for ensuring VCDS operates smoothly.
- Antivirus Software: Antivirus programs can sometimes interfere with VCDS, especially after updates. Add VCDS to the exception list in your antivirus software to prevent it from scanning VCDS files.
- Firewall Software: Firewall software can block VCDS from accessing the internet or communicating with the vehicle. Add VCDS to the list of allowed programs in your firewall.
- Virtual Machine Software: Virtual machine software like Parallels or Virtual PC is not supported by VCDS and can cause various issues.
- HID Utilities: HID utilities for add-on mice or keyboards can interfere with VCDS. Run msconfig on your PC to check Startup programs and turn off any that may be interfering
- Citrix Apps: Citrix apps for remoting into a workplace can have settings that prevent VCDS and/or the Config from seeing their interface.
- Dell Mobile Connect: Dell Mobile Connect Startup and Dell Mobile Connect Welcome can cause problems where the VCDS Infterface Config cannot display the interface information.
12. Is It Necessary to Perform a Registry Scan and DLL Cleanup for VCDS?
While not always necessary, performing a registry scan and DLL cleanup can sometimes resolve issues with VCDS, especially after uninstalling and reinstalling the software. Registry entries and DLL files left behind by previous installations can cause conflicts and errors.
However, be cautious when performing registry scans and DLL cleanups, as incorrect modifications to the registry can cause system instability. It’s recommended to back up your registry before making any changes.
- Use a Registry Cleaner: Use a reputable registry cleaner tool to scan your registry for errors and invalid entries.
- Back Up Your Registry: Before running the registry cleaner, back up your registry in case something goes wrong.
- Run the Registry Cleaner: Follow the instructions provided by the registry cleaner to scan and clean your registry.
- Restart Your Computer: Restart your computer after cleaning the registry.
13. Is VCDS Compatible With Virtualized Operating Systems?
Virtualized operating systems like Parallels or Virtual PC are generally not supported by VCDS. While VCDS may work in some virtualized environments, it’s not guaranteed, and you may encounter various issues.
- Boot Camp: If you’re using a Mac, running Windows via Boot Camp is a supported alternative to virtualization. Boot Camp allows you to install Windows directly on your Mac’s hardware, providing better performance and compatibility compared to virtualization.
14. What External Devices Can Interfere With VCDS?
Certain external devices connected to your vehicle or computer can interfere with VCDS, preventing it from communicating correctly or causing errors.
- GPS Trackers: GPS trackers connected to the diagnostic port can interfere with VCDS. Disconnect any GPS trackers before using VCDS.
- Add-On Gauges: Add-on gauges like Polar FIS connected to the diagnostic port can interfere with VCDS. Disconnect any add-on gauges before using VCDS.
- USB Devices: Some USB devices connected to your computer can interfere with VCDS. Try disconnecting any unnecessary USB devices before using VCDS.
15. How to Handle Error 39 in Windows 10 With VCDS?
Error 39 in Windows 10 can occur when VCDS is unable to access a device due to driver issues or conflicts.
- Update Drivers: Make sure your VCDS interface drivers are up to date.
- Reinstall Drivers: Try uninstalling and reinstalling the VCDS interface drivers.
- Check Device Manager: Check the Device Manager for any errors related to the VCDS interface.
- Compatibility Mode: Try running VCDS in compatibility mode for Windows 7 or Windows 8.
- Run as Administrator: Run VCDS as an administrator.
16. How Can Disabling Cortana Help With VCDS Interface Recognition?
In some cases, disabling Cortana on Windows 10 can resolve issues with VCDS interface recognition. Cortana, the Windows virtual assistant, can sometimes interfere with hardware devices.
- Disable Cortana: Disable Cortana on your Windows 10 machine.
- Restart HID Service: Manually restart the HID (Human Interface Device) service.
- Restart Your Computer: Restart your computer to ensure the changes take effect.
17. How Does Memory Integrity in Windows 11 Affect VCDS?
In Windows 11, the “Memory integrity” feature in Core Isolation can sometimes prevent VCDS from functioning correctly.
- Open Windows Security: Go to Settings -> Update & Security -> Windows Security.
- Device Security: Click on “Device Security.”
- Core Isolation: Click on “Core Isolation.”
- Turn Off Memory Integrity: If “Memory integrity” is turned on, turn it off.
- Restart Your Computer: Restart your computer to ensure the changes take effect.
18. What Is The Significance of Rebooting the PC With the HEX-V2 Plugged In?
Rebooting the PC with the HEX-V2 plugged in has resolved interface recognition issues for some users. This step may help the system properly recognize and initialize the device.
- Plug In HEX-V2: Ensure your HEX-V2 interface is plugged into a USB port on your computer.
- Reboot Your Computer: Restart your computer with the HEX-V2 interface plugged in.
- Test VCDS: After the reboot, test VCDS to see if the interface is now recognized.
19. How CAR-CODING.EDU.VN Can Help You With VCDS Issues?
CAR-CODING.EDU.VN offers expert remote support to resolve VCDS issues quickly and efficiently. Our experienced technicians can remotely diagnose and fix connectivity problems, software conflicts, and other issues that prevent your VCDS interface from working correctly.
Here’s how we can help:
- Remote Diagnostics: We can remotely diagnose the cause of your VCDS issues.
- Driver Installation and Configuration: We can assist with installing and configuring the correct drivers for your VCDS interface.
- Software Troubleshooting: We can troubleshoot software conflicts and other issues that may be affecting VCDS performance.
- Firmware Updates: We can guide you through the firmware update process.
- Coding and Programming Support: We offer coding and programming support for various vehicle makes and models.
We understand the challenges of working with complex automotive systems. That’s why CAR-CODING.EDU.VN is dedicated to providing reliable and professional support to technicians and shop owners. Let us help you get your VCDS interface working correctly so you can get back to diagnosing and coding vehicles.
20. FAQ About VCDS and Interface Issues
Here are some frequently asked questions about VCDS and interface issues:
- Is it safe to perform coding on my car using VCDS?
- Yes, when done correctly. Ensure you have a stable power source, backup your original settings, and follow reliable coding procedures. CAR-CODING.EDU.VN offers expert guidance to ensure safe and successful coding.
- What is the process for getting remote support from CAR-CODING.EDU.VN?
- Contact us via Whatsapp (+1 (641) 206-8880) or through our website (CAR-CODING.EDU.VN) to schedule a remote support session. Our technicians will guide you through the connection process.
- How much does remote VCDS support cost?
- The cost of remote support varies depending on the complexity of the issue and the time required to resolve it. Contact us for a customized quote.
- What types of vehicles and features are supported by CAR-CODING.EDU.VN for coding?
- We support a wide range of vehicle makes and models, including VW, Audi, BMW, Mercedes-Benz, and more. We offer coding for various features, such as activating hidden functions, improving performance, and customizing vehicle settings.
- What equipment is required on my end for remote VCDS support?
- You’ll need a VCDS interface, a Windows-based computer with a stable internet connection, and the TeamViewer software installed.
- How long does a typical remote support session last?
- The duration of a remote support session depends on the complexity of the issue. Simple issues can be resolved in as little as 30 minutes, while more complex issues may take longer.
- What if the remote support doesn’t fix my problem?
- We strive to resolve all issues during the remote support session. If we’re unable to fix your problem, we’ll provide a refund or offer alternative solutions.
- Can CAR-CODING.EDU.VN help with ECU programming and flashing?
- Yes, we offer ECU programming and flashing services for various vehicle makes and models. Contact us for more information.
- How can I ensure the security of my vehicle during remote coding?
- CAR-CODING.EDU.VN uses secure remote access protocols to protect your vehicle’s data and systems. Our technicians follow industry best practices to ensure the security of your vehicle during coding.
- What if I accidentally mess up the coding on my car?
- It’s important to backup your original settings before making any changes. If you accidentally mess up the coding, you can restore the original settings. CAR-CODING.EDU.VN can also assist with restoring your vehicle’s settings.
Experiencing VCDS issues can be a major roadblock in your work. But with the right knowledge and support, you can overcome these challenges and unlock the full potential of VCDS.
Don’t let VCDS interface problems slow you down. Contact CAR-CODING.EDU.VN today for expert remote support and get back to diagnosing and coding vehicles with confidence. Call or message us on Whatsapp at +1 (641) 206-8880, or visit our website at CAR-CODING.EDU.VN. Our US support office is located at 100 Tech Innovation Dr, Suite 500, San Jose, CA 95110, United States. We’re here to help you succeed in the world of automotive diagnostics and coding.