Modern car coding can be complex, but what are the possibilities for your Audi A3 2010 using VCDS tweaks, and how can you do it safely? With specialized remote support from CAR-CODING.EDU.VN, you can enable hidden features and optimize your car’s performance. We offer expert help for ECU programming, adaptations, and advanced diagnostics.
Contents
- 1. What VCDS Tweaks Are Available for Your Audi A3 2010?
- 1.1 Popular VCDS Tweaks for Audi A3 2010 Models
- 1.2 Safety First: Understanding the Risks
- 1.3 Why Professional Assistance is Crucial
- 1.4 Common Coding Errors and How to Avoid Them
- 2. What Tools and Software Do You Need for Audi A3 2010 VCDS Tweaks?
- 2.1 Essential Hardware
- 2.2 Essential Software
- 2.3 Optional but Recommended Tools
- 2.4 Setting Up Your Equipment
- 2.5 Remote Support from CAR-CODING.EDU.VN
- 3. How to Connect VCDS to Your Audi A3 2010 for Coding?
- 3.1 Preparation
- 3.2 Step-by-Step Connection Process
- 3.3 Troubleshooting Connection Issues
- 3.4 Remote Assistance from CAR-CODING.EDU.VN
- 4. What Are Some Common Audi A3 2010 Coding Adaptations?
- 4.1 Lighting Adaptations
- 4.2 Comfort and Convenience Adaptations
- 4.3 Instrument Cluster Adaptations
- 4.4 Safety and Security Adaptations
- 4.5 Important Considerations
- 4.6 Remote Support from CAR-CODING.EDU.VN
- 5. How to Enable Hidden Features on Your Audi A3 2010 with VCDS?
- 5.1 Understanding Hidden Features
- 5.2 Preparing for Coding
- 5.3 Common Hidden Features and How to Enable Them
- 5.4 Potential Risks and Mitigation
- 5.5 Remote Support from CAR-CODING.EDU.VN
- 6. What Are the Benefits of Remote Coding Support for Your Audi A3 2010?
- 6.1 Convenience and Time Savings
- 6.2 Access to Expert Knowledge
- 6.3 Cost-Effectiveness
- 6.4 Safety and Security
- 6.5 Wide Range of Services
- 6.6 Real-Time Support
1. What VCDS Tweaks Are Available for Your Audi A3 2010?
VCDS tweaks for your Audi A3 2010 unlock hidden features and customize vehicle settings. CAR-CODING.EDU.VN provides expert remote support to safely implement these tweaks.
VCDS (VAG-COM Diagnostic System) is a software and hardware interface used to diagnose and customize Volkswagen Audi Group (VAG) vehicles. For the Audi A3 2010, VCDS tweaks offer a range of possibilities, from enabling hidden features to customizing existing vehicle settings. However, it’s crucial to understand what’s possible and how to execute these tweaks safely.
1.1 Popular VCDS Tweaks for Audi A3 2010 Models
Here are some common VCDS tweaks that Audi A3 2010 owners often explore, along with the potential benefits and considerations for each:
| Tweak | Description | Benefits | Considerations |
|---|---|---|---|
| Needle Sweep | Activates a gauge needle sweep upon ignition, where the instrument cluster needles move to their maximum position and then back. | Enhances the visual appeal of the instrument cluster, providing a sporty feel. | Primarily cosmetic; may not be supported on all instrument clusters. |
| Battery Meter Display | Displays the battery voltage in the MMI or DIS (Driver Information System). | Allows for easy monitoring of battery health, helping to prevent unexpected battery failures. | Accuracy can vary; use in conjunction with other diagnostic tools for comprehensive battery testing. |
| Comfort Windows Operation | Enables the ability to open and close windows using the remote key fob. | Convenient for ventilation on hot days or quickly closing windows in case of rain. | Requires proper coding to ensure safety and prevent unintended operation. |
| Coming/Leaving Home Lights | Activates the headlights or fog lights to illuminate the area around the vehicle when unlocking or locking it in low-light conditions. | Enhances safety and convenience by providing better visibility when approaching or leaving the car. | May require adjustment of timer settings to optimize battery life. |
| Emergency Braking Flashing | Activates hazard lights to flash rapidly during hard braking to alert following drivers. | Enhances safety by providing a more visible warning signal during emergency braking situations. | May need to be adjusted to comply with local regulations regarding emergency braking signals. |
| Open/Close Windows With Keyfob | Open or close all windows and sunroof (if equipped) by holding the open/close button on the keyfob. | Convenient for quickly venting the car on a hot day before getting in, or closing all windows at once if rain suddenly starts. | Ensure the feature is properly coded to prevent accidental activation. Be aware of the pinch protection system to prevent injury. |
| Disable Amber Side Markers | Deactivate the always-on amber side marker lights. | A cleaner, more streamlined look for some owners. | May not be legal in all jurisdictions. Check local laws before disabling. |
1.2 Safety First: Understanding the Risks
While VCDS tweaks can enhance your Audi A3 2010, they also come with inherent risks:
- ECU Corruption: Incorrect coding can lead to ECU malfunctions, requiring expensive repairs.
- Warranty Issues: Unauthorized modifications may void your vehicle’s warranty.
- System Instability: Improper tweaks can cause various systems to become unstable or non-functional.
1.3 Why Professional Assistance is Crucial
Given these risks, seeking professional assistance from experts like CAR-CODING.EDU.VN is highly recommended. Here’s why:
- Expert Knowledge: Professionals have in-depth knowledge of the Audi A3 2010’s systems and coding parameters.
- Safe Procedures: They follow established procedures to minimize risks and ensure successful tweaks.
- Diagnostic Capabilities: They can diagnose and resolve any issues that may arise during the coding process.
- Remote Support: CAR-CODING.EDU.VN offers remote support, allowing you to benefit from expert guidance without needing to visit a physical location.
1.4 Common Coding Errors and How to Avoid Them
Even with professional assistance, it’s helpful to understand common coding errors and how to avoid them:
- Incorrect Coding Values: Always double-check coding values before applying them. Refer to reliable sources or consult with experts.
- Incompatible Hardware: Ensure that the desired tweak is compatible with your vehicle’s hardware.
- Software Glitches: Use the latest version of VCDS software and a stable computer connection to avoid software glitches.
- Backup and Restore: Always back up your vehicle’s original coding before making any changes. This allows you to restore the original settings if something goes wrong.
By understanding the available VCDS tweaks, potential risks, and the importance of professional assistance, you can make informed decisions about customizing your Audi A3 2010. CAR-CODING.EDU.VN is here to provide the expert support you need to safely and effectively enhance your vehicle’s features and performance.
2. What Tools and Software Do You Need for Audi A3 2010 VCDS Tweaks?
To perform VCDS tweaks on your Audi A3 2010, you need the right tools and software. CAR-CODING.EDU.VN can guide you through the selection and setup process.
When it comes to performing VCDS tweaks on your Audi A3 2010, having the right tools and software is essential. Using the correct equipment not only ensures a smoother coding process but also minimizes the risk of damaging your vehicle’s electronic control units (ECUs). Here’s a breakdown of what you’ll need:
2.1 Essential Hardware
-
VCDS Interface Cable:
-
Description: The VCDS interface cable is the primary hardware component that connects your laptop to your Audi A3 2010’s OBD-II port. This cable allows communication between the VCDS software and the vehicle’s ECUs.
-
Recommendation: Purchase a genuine Ross-Tech VCDS interface cable. While there are cheaper alternatives available, genuine Ross-Tech cables come with official software licenses, reliable performance, and access to Ross-Tech’s support and updates. Cloned or counterfeit cables can be unreliable and may cause damage to your vehicle’s electronics.
 VCDS Cable
Alt text: Ross-Tech VCDS Interface Cable connected to OBD-II port, essential for Audi A3 2010 VCDS tweaks.
-
-
Laptop:
-
Description: A laptop is required to run the VCDS software and interface with the VCDS cable.
-
Specifications:
- Operating System: Windows 7, 8, 10, or 11 (32-bit or 64-bit). VCDS is primarily designed for Windows, so using a Windows-based laptop is highly recommended.
- Processor: Intel Pentium or equivalent.
- RAM: 2 GB or more.
- Storage: 1 GB of free disk space.
- Ports: USB port for connecting the VCDS cable.
-
Recommendation: Use a dedicated laptop for VCDS coding to avoid conflicts with other software. Ensure the laptop’s battery is fully charged or connected to a power source during coding to prevent interruptions.
-
2.2 Essential Software
-
VCDS Software:
- Description: VCDS (VAG-COM Diagnostic System) is the proprietary software developed by Ross-Tech for diagnosing and coding VAG vehicles, including the Audi A3 2010.
- Features:
- Vehicle Diagnostics: Reads and clears diagnostic trouble codes (DTCs) from various ECUs.
- Coding and Adaptation: Allows you to modify vehicle settings, enable hidden features, and perform adaptations.
- Data Logging: Records real-time data from sensors and modules for performance analysis.
- Actuator Tests: Tests the functionality of various components and systems.
- Installation:
- Download the latest version of the VCDS software from the Ross-Tech website.
- Install the software on your laptop, following the on-screen instructions.
- Activate the software using the license key provided with your genuine Ross-Tech VCDS interface cable.
- Updates: Regularly update the VCDS software to ensure compatibility with the latest vehicle models and to access the newest features and bug fixes.
2.3 Optional but Recommended Tools
-
Battery Charger/Maintainer:
- Description: A battery charger or maintainer is used to keep your Audi A3 2010’s battery fully charged during the coding process.
- Why: Coding can take a significant amount of time, and a low battery can interrupt the process, potentially causing ECU corruption.
- Recommendation: Use a quality battery charger/maintainer that provides a stable voltage output.
-
OBD-II Extension Cable:
- Description: An OBD-II extension cable allows you to connect the VCDS cable to the OBD-II port without straining the port or the cable.
- Why: Useful if the OBD-II port is in an awkward location or if you need to position your laptop outside the vehicle.
- Recommendation: Choose a high-quality extension cable that provides a secure and reliable connection.
-
Voltage Meter:
- Description: A voltage meter can be used to monitor the battery voltage during the coding process.
- Why: Provides a real-time indication of the battery’s health, allowing you to take action if the voltage drops too low.
- Recommendation: Use a digital multimeter for accurate voltage readings.
2.4 Setting Up Your Equipment
- Install VCDS Software: Follow the instructions provided by Ross-Tech to install and activate the VCDS software on your laptop.
- Connect VCDS Cable: Plug the VCDS interface cable into your laptop’s USB port and the OBD-II port in your Audi A3 2010. The OBD-II port is typically located under the dashboard on the driver’s side.
- Turn On Ignition: Turn on the ignition of your Audi A3 2010 without starting the engine.
- Test Connection: Launch the VCDS software and go to the “Options” screen. Click the “Test” button to verify that the software can communicate with the VCDS cable and your vehicle.
- Select Vehicle: In VCDS, select your vehicle type (Audi) and model (A3 2010) to ensure proper communication and coding.
2.5 Remote Support from CAR-CODING.EDU.VN
Setting up the tools and software for VCDS tweaks can be complex, especially for those new to vehicle coding. CAR-CODING.EDU.VN offers remote support to guide you through the entire process. Our experts can assist with:
- Software Installation: Helping you install and activate the VCDS software correctly.
- Connection Setup: Ensuring that your VCDS cable is properly connected to your laptop and vehicle.
- Troubleshooting: Resolving any connection or communication issues that may arise.
- Coding Guidance: Providing step-by-step instructions for performing specific VCDS tweaks safely and effectively.
By having the right tools and software, and with the support of CAR-CODING.EDU.VN, you can confidently perform VCDS tweaks on your Audi A3 2010 and unlock its hidden potential.
3. How to Connect VCDS to Your Audi A3 2010 for Coding?
Connecting VCDS to your Audi A3 2010 requires a systematic approach. CAR-CODING.EDU.VN provides remote assistance to ensure a smooth and secure connection process.
Connecting your VCDS (VAG-COM Diagnostic System) to your Audi A3 2010 is the first step in performing diagnostics, coding, and adaptations. A proper connection ensures seamless communication between your vehicle’s electronic control units (ECUs) and the VCDS software on your laptop. Here’s a comprehensive guide on how to establish this connection:
3.1 Preparation
-
Gather Required Equipment:
- VCDS Interface Cable (Genuine Ross-Tech recommended)
- Laptop with VCDS software installed and activated
- Audi A3 2010 vehicle
-
Ensure Software is Up-to-Date:
- Check that you have the latest version of the VCDS software installed on your laptop. Regular updates ensure compatibility with your vehicle and include the latest features and bug fixes.
-
Vehicle Battery Condition:
- Verify that your Audi A3 2010’s battery is in good condition and fully charged. A low battery can interrupt the coding process and potentially cause ECU corruption. If necessary, use a battery charger or maintainer to keep the battery voltage stable during the connection and coding process.
3.2 Step-by-Step Connection Process
-
Locate the OBD-II Port:
- The OBD-II (On-Board Diagnostics II) port is typically located under the dashboard on the driver’s side of your Audi A3 2010. It may be covered by a small panel that needs to be opened or removed.
-
Connect the VCDS Interface Cable:
- Plug one end of the VCDS interface cable into the USB port on your laptop.
- Plug the other end of the VCDS interface cable into the OBD-II port of your Audi A3 2010. Ensure the connection is secure.
-
Turn On the Ignition:
- Insert the key into the ignition and turn it to the “ON” position without starting the engine. This provides power to the vehicle’s electrical system and allows the ECUs to communicate with the VCDS software.
-
Launch the VCDS Software:
- Open the VCDS software on your laptop.
-
Test the Connection:
- In the VCDS software, click on the “Options” button.
- Select the correct COM port for your VCDS interface cable. If you’re unsure which COM port to select, use the “Test” button to automatically detect the correct port.
- Click the “Test” button to verify that the VCDS software can communicate with the interface cable and your vehicle. A successful test will display information about the interface cable, its status, and the vehicle’s protocol.
-
Select Vehicle Type:
- After a successful connection test, go back to the main screen of the VCDS software.
- Click on the “Select” button to choose the vehicle type.
- Select “Audi” as the vehicle manufacturer and then choose “A3” as the model.
- Select the appropriate engine code or control module based on the specific function you want to access.
3.3 Troubleshooting Connection Issues
If you encounter issues while connecting VCDS to your Audi A3 2010, consider the following troubleshooting steps:
-
Check Cable Connections:
- Ensure that the VCDS interface cable is securely plugged into both the laptop’s USB port and the vehicle’s OBD-II port.
- Try using a different USB port on your laptop to rule out any port-related issues.
-
Verify Ignition Status:
- Make sure the ignition is turned to the “ON” position without starting the engine.
-
Update VCDS Software:
- Ensure that you are using the latest version of the VCDS software. Outdated software may have compatibility issues with your vehicle.
-
Check Cable Drivers:
- Verify that the drivers for the VCDS interface cable are properly installed on your laptop. You can typically find the drivers on the Ross-Tech website.
-
Disable Antivirus Software:
- Temporarily disable any antivirus software on your laptop, as it may interfere with the VCDS software’s communication with the interface cable.
-
Test with Another Vehicle:
- If possible, try connecting the VCDS interface cable to another compatible vehicle to determine if the issue is with the cable or your Audi A3 2010.
-
Contact Support:
- If you’ve tried all the troubleshooting steps and are still unable to connect, contact Ross-Tech support for further assistance.
3.4 Remote Assistance from CAR-CODING.EDU.VN
Establishing a reliable VCDS connection can be challenging, especially for those new to vehicle diagnostics and coding. CAR-CODING.EDU.VN offers remote assistance to guide you through the entire connection process. Our experts can help with:
- Driver Installation: Assisting you in installing the correct drivers for your VCDS interface cable.
- Connection Testing: Verifying that your VCDS software is properly communicating with your vehicle.
- Troubleshooting: Diagnosing and resolving any connection issues that may arise.
- Software Configuration: Ensuring that your VCDS software is correctly configured for your Audi A3 2010.
By following these steps and with the support of CAR-CODING.EDU.VN, you can confidently connect VCDS to your Audi A3 2010 and unlock its diagnostic and coding capabilities.
4. What Are Some Common Audi A3 2010 Coding Adaptations?
Audi A3 2010 coding adaptations allow customization of vehicle features. CAR-CODING.EDU.VN offers expert guidance to safely implement these adaptations.
Coding adaptations for the Audi A3 2010 provide a way to customize and enhance various vehicle features, improving both convenience and functionality. Using VCDS (VAG-COM Diagnostic System), you can modify settings within the car’s electronic control units (ECUs) to tailor the vehicle to your preferences. However, it’s essential to approach these adaptations with caution and expertise to avoid potential issues. Here are some common Audi A3 2010 coding adaptations:
4.1 Lighting Adaptations
-
Coming Home/Leaving Home Lights:
- Description: This adaptation enables the headlights, fog lights, or other exterior lights to illuminate the area around the vehicle when you unlock (Coming Home) or lock (Leaving Home) it, especially useful in low-light conditions.
- Coding Steps:
- Select Control Module 09 (Central Electronics).
- Go to Security Access and enter the appropriate code (usually 31347).
- Go to Adaptation and find the channels related to Coming Home and Leaving Home.
- Adjust the settings to activate the desired lights and set the duration.
- Benefits: Enhanced safety and convenience by providing better visibility when approaching or leaving the vehicle.
-
Cornering Fog Lights:
- Description: Activating cornering fog lights causes the fog lights on the side you’re turning to illuminate, improving visibility during turns at low speeds.
- Coding Steps:
- Select Control Module 09 (Central Electronics).
- Go to Security Access and enter the appropriate code.
- Go to Adaptation and find the channels related to cornering lights.
- Activate the function and adjust the speed threshold if necessary.
- Benefits: Improved visibility and safety during low-speed turns.
-
Daytime Running Lights (DRL) Behavior:
- Description: Customize the behavior of the daytime running lights, such as dimming them when the turn signals are activated or turning them off completely.
- Coding Steps:
- Select Control Module 09 (Central Electronics).
- Go to Coding and adjust the DRL settings according to your preferences.
- Benefits: Tailor the DRLs to your desired appearance and functionality.
4.2 Comfort and Convenience Adaptations
-
Comfort Windows Operation:
- Description: This feature allows you to open and close the windows and sunroof (if equipped) using the remote key fob.
- Coding Steps:
- Select Control Module 46 (Central Convenience).
- Go to Adaptation and find the channels related to comfort operation.
- Activate the function and adjust the settings as needed.
- Benefits: Convenient for quickly ventilating the car on a hot day or closing all windows at once if it starts to rain.
-
Acoustic Confirmation for Lock/Unlock:
- Description: Enable an audible beep when you lock or unlock the vehicle using the remote key fob.
- Coding Steps:
- Select Control Module 09 (Central Electronics).
- Go to Adaptation and find the channels related to acoustic confirmation.
- Activate the function and adjust the volume if necessary.
- Benefits: Provides clear confirmation that the vehicle has been successfully locked or unlocked.
-
Seatbelt Warning Deactivation:
- Description: Deactivate the seatbelt warning chime for specific situations (e.g., when moving the car short distances within a garage).
- Coding Steps:
- Select Control Module 17 (Instruments).
- Go to Coding and adjust the seatbelt warning settings.
- Benefits: Reduces annoyance when seatbelts are not needed for short, low-speed movements.
- Note: Use this adaptation responsibly and always wear your seatbelt when driving on public roads.
4.3 Instrument Cluster Adaptations
-
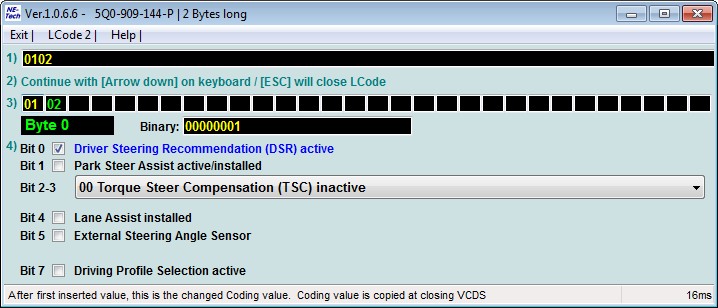
Needle Sweep (Staging):
- Description: Activates a gauge needle sweep upon ignition, where the instrument cluster needles move to their maximum position and then back.
- Coding Steps:
- Select Control Module 17 (Instruments).
- Go to Adaptation and find the channel related to needle sweep.
- Activate the function.
- Benefits: Enhances the visual appeal of the instrument cluster.
-
Battery Voltage Display:
- Description: Displays the battery voltage in the Multi-Function Display (MFD) or Driver Information System (DIS).
- Coding Steps:
- Select Control Module 17 (Instruments).
- Go to Adaptation and find the channel related to battery voltage display.
- Activate the function.
- Benefits: Allows for easy monitoring of battery health.
4.4 Safety and Security Adaptations
-
Emergency Braking Flashing:
- Description: Activates hazard lights to flash rapidly during hard braking to alert following drivers.
- Coding Steps:
- Select Control Module 09 (Central Electronics).
- Go to Adaptation and find the channels related to emergency braking flashing.
- Activate the function and adjust the threshold if necessary.
- Benefits: Enhances safety by providing a more visible warning signal during emergency braking situations.
4.5 Important Considerations
- Backup Original Coding: Before making any changes, always back up the original coding of the control module. This allows you to revert to the original settings if something goes wrong.
- Use Reliable Information: Only use coding information from reliable sources, such as Ross-Tech’s website or experienced VCDS users.
- Understand the Function: Ensure you fully understand the function you are enabling or modifying and its potential impact on your vehicle.
- Battery Condition: Maintain a stable battery voltage during the coding process to prevent interruptions.
4.6 Remote Support from CAR-CODING.EDU.VN
Coding adaptations can be complex and carry some risk if not performed correctly. CAR-CODING.EDU.VN offers remote support to guide you through the entire process. Our experts can assist with:
- Identifying Adaptations: Helping you identify the available adaptations for your Audi A3 2010.
- Step-by-Step Instructions: Providing clear, step-by-step instructions for performing each adaptation.
- Troubleshooting: Resolving any issues that may arise during the coding process.
- Safety Checks: Ensuring that each adaptation is performed safely and correctly.
By understanding these common Audi A3 2010 coding adaptations and with the support of CAR-CODING.EDU.VN, you can safely customize your vehicle to your preferences and enhance its functionality.
5. How to Enable Hidden Features on Your Audi A3 2010 with VCDS?
Enable hidden features on your Audi A3 2010 using VCDS with expert guidance from CAR-CODING.EDU.VN, ensuring safety and functionality.
Enabling hidden features on your Audi A3 2010 with VCDS (VAG-COM Diagnostic System) can unlock functionalities that were either disabled from the factory or not activated due to regional settings. These hidden features can enhance your driving experience and add convenience to your vehicle. However, it’s crucial to proceed with caution and follow expert guidance to avoid potential issues. Here’s a detailed guide on how to enable some common hidden features on your Audi A3 2010 using VCDS:
5.1 Understanding Hidden Features
Hidden features are functionalities that are present in the vehicle’s software but are not enabled by default. These features may be disabled for various reasons, such as:
- Regional Regulations: Some features may not be legal or compliant in certain regions.
- Vehicle Configuration: Features may be disabled based on the specific configuration of the vehicle (e.g., trim level, optional equipment).
- Marketing Strategy: Automakers may disable certain features to differentiate between models or to encourage customers to purchase higher trim levels.
5.2 Preparing for Coding
Before attempting to enable any hidden features, it’s essential to take the following precautions:
-
Backup Original Coding:
- Before making any changes, always back up the original coding of the control module. This allows you to revert to the original settings if something goes wrong.
-
Use Reliable Information:
- Only use coding information from reliable sources, such as Ross-Tech’s website, experienced VCDS users, or professional coding services like CAR-CODING.EDU.VN.
-
Understand the Function:
- Ensure you fully understand the function you are enabling and its potential impact on your vehicle.
-
Maintain Battery Voltage:
- Maintain a stable battery voltage during the coding process to prevent interruptions. Use a battery charger or maintainer if necessary.
5.3 Common Hidden Features and How to Enable Them
-
Gauge Needle Sweep (Staging):
- Description: Activates a gauge needle sweep upon ignition, where the instrument cluster needles move to their maximum position and then back.
- Coding Steps:
- Select Control Module 17 (Instruments).
- Go to Adaptation.
- Find the channel related to “Staging” or “Needle Sweep.”
- Change the value to “Active” or “Yes.”
- Benefits: Enhances the visual appeal of the instrument cluster.
-
Battery Voltage Display:
- Description: Displays the battery voltage in the Multi-Function Display (MFD) or Driver Information System (DIS).
- Coding Steps:
- Select Control Module 17 (Instruments).
- Go to Adaptation.
- Find the channel related to “Battery Voltage Display.”
- Change the value to “Active” or “Yes.”
- Benefits: Allows for easy monitoring of battery health.
-
Cornering Fog Lights:
- Description: Activates cornering fog lights, which cause the fog lights on the side you’re turning to illuminate, improving visibility during turns at low speeds.
- Coding Steps:
- Select Control Module 09 (Central Electronics).
- Go to Security Access and enter the appropriate code (usually 31347).
- Go to Adaptation.
- Find the channels related to “Cornering Lights” or “Fog Lights as Cornering Lights.”
- Activate the function and adjust the speed threshold if necessary.
- Benefits: Improved visibility and safety during low-speed turns.
-
Comfort Windows Operation with Key Fob:
- Description: Enables the ability to open and close the windows and sunroof (if equipped) using the remote key fob.
- Coding Steps:
- Select Control Module 46 (Central Convenience).
- Go to Adaptation.
- Find the channels related to “Comfort Opening” and “Comfort Closing.”
- Activate the functions and adjust the settings as needed.
- Benefits: Convenient for quickly ventilating the car on a hot day or closing all windows at once if it starts to rain.
-
Acoustic Confirmation for Lock/Unlock:
- Description: Enable an audible beep when you lock or unlock the vehicle using the remote key fob.
- Coding Steps:
- Select Control Module 09 (Central Electronics).
- Go to Adaptation.
- Find the channels related to “Acoustic Confirmation” or “Lock/Unlock Beep.”
- Activate the function and adjust the volume if necessary.
- Benefits: Provides clear confirmation that the vehicle has been successfully locked or unlocked.
-
Emergency Braking Flashing:
- Description: Activates hazard lights to flash rapidly during hard braking to alert following drivers.
- Coding Steps:
- Select Control Module 09 (Central Electronics).
- Go to Adaptation.
- Find the channels related to “Emergency Braking Flashing” or “Hazard Lights during Emergency Braking.”
- Activate the function and adjust the threshold if necessary.
- Benefits: Enhances safety by providing a more visible warning signal during emergency braking situations.
5.4 Potential Risks and Mitigation
Enabling hidden features carries some risk if not performed correctly. Potential risks include:
- ECU Malfunctions: Incorrect coding can lead to ECU malfunctions, requiring expensive repairs.
- System Instability: Improper tweaks can cause various systems to become unstable or non-functional.
- Warranty Issues: Unauthorized modifications may void your vehicle’s warranty.
To mitigate these risks, it’s essential to:
- Follow Expert Guidance: Seek guidance from experienced VCDS users or professional coding services.
- Double-Check Coding Values: Always double-check coding values before applying them.
- Backup and Restore: Always back up your vehicle’s original coding before making any changes.
- Test Thoroughly: After enabling a hidden feature, test it thoroughly to ensure it functions correctly and does not cause any adverse effects.
5.5 Remote Support from CAR-CODING.EDU.VN
Enabling hidden features can be complex and carry some risk if not performed correctly. CAR-CODING.EDU.VN offers remote support to guide you through the entire process. Our experts can assist with:
- Identifying Hidden Features: Helping you identify the available hidden features for your Audi A3 2010.
- Step-by-Step Instructions: Providing clear, step-by-step instructions for enabling each feature.
- Troubleshooting: Resolving any issues that may arise during the coding process.
- Safety Checks: Ensuring that each feature is enabled safely and correctly.
By understanding these steps and with the support of CAR-CODING.EDU.VN, you can safely enable hidden features on your Audi A3 2010 and enhance your driving experience.
6. What Are the Benefits of Remote Coding Support for Your Audi A3 2010?
Remote coding support for your Audi A3 2010 offers numerous benefits. CAR-CODING.EDU.VN provides reliable and efficient remote assistance.
Remote coding support for your Audi A3 2010 offers a range of benefits, making it an attractive option for vehicle owners looking to customize their cars, enable hidden features, or perform advanced diagnostics. This service provides expert assistance without the need to visit a physical shop, saving time and offering convenience. Here’s a detailed look at the advantages of remote coding support:
6.1 Convenience and Time Savings
-
No Need to Travel:
- Remote coding eliminates the need to drive to a physical coding shop or dealership. This saves you valuable time and reduces travel expenses.
-
Flexible Scheduling:
- Remote coding sessions can be scheduled at your convenience. Whether you prefer evenings, weekends, or specific times during the day, you can arrange a session that fits your schedule.
-
Reduced Downtime:
- With remote coding, your vehicle experiences minimal downtime. The coding process is typically completed in a few hours, allowing you to get back on the road quickly.
6.2 Access to Expert Knowledge
-
Experienced Technicians:
- Remote coding services connect you with experienced technicians who specialize in Audi coding and programming. These experts have in-depth knowledge of the Audi A3 2010’s systems and coding parameters.
-
Up-to-Date Information:
- Remote coding providers stay up-to-date with the latest coding information, software updates, and vehicle models. This ensures that you receive accurate and reliable coding assistance.
-
Specialized Skills:
- Remote coding technicians possess specialized skills in ECU programming, adaptation, and diagnostics, allowing them to handle complex coding tasks with confidence.
6.3 Cost-Effectiveness
-
Lower Overhead Costs:
- Remote coding services typically have lower overhead costs compared to physical shops, which can translate into more competitive pricing for customers.
-
No Transportation Costs:
- You avoid the cost of transporting your vehicle to a coding shop or dealership, saving on fuel, tolls, and potential transportation expenses.
-
Reduced Labor Costs:
- Remote coding sessions can often be completed more quickly than in-person coding, reducing the overall labor costs.
6.4 Safety and Security
-
Safe Coding Practices:
- Reputable remote coding services follow safe coding practices to minimize the risk of ECU corruption or system instability. They use verified coding procedures and take necessary precautions to protect your vehicle’s electronics.
-
Backup and Restore:
- Before making any changes, remote coding technicians typically back up your vehicle’s original coding. This allows them to restore the original settings if something goes wrong.
-
Secure Connections:
- Remote coding sessions are conducted through secure connections to protect your vehicle’s data and prevent unauthorized access.
6.5 Wide Range of Services
-
Feature Activation:
- Remote coding support can be used to enable hidden features on your Audi A3 2010, such as gauge needle sweep, battery voltage display, cornering fog lights, and more.
-
Customization:
- You can customize various vehicle settings, such as lighting behavior, comfort operation, and instrument cluster displays, to tailor the car to your preferences.
-
Diagnostics:
- Remote coding services can also provide diagnostic support, helping you identify and resolve issues with your vehicle’s systems.
-
ECU Programming:
- For more advanced tasks, remote coding technicians can perform ECU programming, flashing, and adaptations to optimize your vehicle’s performance.
6.6 Real-Time Support
-
Instant Assistance:
- Remote coding services provide real-time support during the coding session, allowing you to ask questions and receive immediate assistance.
-
Step-by-Step Guidance:
- Technicians can guide you through each step of the coding process, ensuring that you understand what’