Facing turbo actuator issues on your Audi 3.0 TDI and seeking solutions with VCDS? CAR-CODING.EDU.VN provides expert remote support for Audi coding, ECU programming, and resolving complex faults like turbo actuator malfunction, ensuring safe and efficient vehicle operation. We offer specialized assistance with VCDS coding, hidden feature activation, and permanent fault code clearing, supporting technicians and shops to address even the most challenging issues.
Contents
- 1. What is Audi 3.0 TDI Turbo Actuator Adaptation with VCDS?
- Why is Turbo Actuator Adaptation Necessary?
- The Role of VCDS in Adaptation
- Common Symptoms Requiring Adaptation
- Potential Issues if Adaptation is Not Performed Correctly
- 2. Understanding the Audi 3.0 TDI Turbocharger System
- Key Components of the Turbocharger System
- How the System Works
- Common Issues with the Turbocharger System
- Diagnosing Turbocharger Problems
- The Importance of Regular Maintenance
- 3. Step-by-Step Guide to Audi 3.0 TDI Turbo Actuator Adaptation Using VCDS
- Prerequisites
- Step 1: Connect VCDS to the Vehicle
- Step 2: Select the Control Module
- Step 3: Access Basic Settings
- Step 4: Monitor the Adaptation Process
- Step 5: Verify the Adaptation
- Troubleshooting Common Issues
- Tips for Successful Adaptation
- 4. Common Issues and Solutions with Audi 3.0 TDI Turbo Actuator Adaptation
- Issue 1: Incorrect Group Number
- Issue 2: Low Battery Voltage
- Issue 3: Faulty Turbo Actuator
- Issue 4: Wiring and Connection Problems
- Issue 5: Communication Errors
- Issue 6: Incorrect Adaptation Values
- Issue 7: Software Compatibility Issues
- Issue 8: Turbocharger Mechanical Issues
- 5. Benefits of Professional Remote Support for Audi Coding and Adaptation
- Expertise and Experience
- Time Efficiency
- Cost Savings
- Accuracy and Precision
- Access to Advanced Tools and Software
- Customized Solutions
- Comprehensive Support
- Risk Mitigation
- Convenience
- 6. Activating Hidden Features on Audi 3.0 TDI with VCDS
- What Are Hidden Features?
- Popular Hidden Features for Audi 3.0 TDI
- Steps to Activate Hidden Features Using VCDS
- Tips for Successful Activation
- Risks and Considerations
- 7. Audi 3.0 TDI Turbo Actuator Replacement: A Quick Guide
- Prerequisites
- Step 1: Disconnect the Battery
- Step 2: Access the Turbo Actuator
- Step 3: Remove the Old Turbo Actuator
- Step 4: Install the New Turbo Actuator
- Step 5: Reassemble Components
- Step 6: Perform Adaptation
- Step 7: Test and Verify
- Tips for Successful Replacement
- 8. Troubleshooting P3348 Error Code on Audi 3.0 TDI
- Understanding the P3348 Error Code
- Common Causes of P3348 Error Code
- Diagnostic Steps for P3348 Error Code
- Solutions for P3348 Error Code
- Tips for Troubleshooting P3348
- 9. Choosing the Right VCDS Cable for Audi 3.0 TDI Coding
- Key Considerations When Choosing a VCDS Cable
- Recommended VCDS Cables for Audi 3.0 TDI
1. What is Audi 3.0 TDI Turbo Actuator Adaptation with VCDS?
Audi 3.0 TDI turbo actuator adaptation with VCDS (VAG-COM Diagnostic System) is the process of calibrating or programming the turbocharger actuator using specialized diagnostic software. This adaptation ensures the actuator functions correctly with the engine control unit (ECU), optimizing turbocharger performance and preventing error codes. The adaptation process is crucial following the replacement of a turbo actuator or when troubleshooting turbocharger-related issues on Audi 3.0 TDI engines.
Why is Turbo Actuator Adaptation Necessary?
Turbo actuator adaptation is essential because the turbocharger’s performance is directly tied to the actuator’s accurate control. The actuator regulates the vanes or flaps within the turbocharger, managing boost pressure based on engine demands. When an actuator is replaced or if the ECU has been reset, adaptation ensures the actuator operates within specified parameters. Accurate adaptation prevents overboost or underboost conditions, which can lead to performance issues, engine damage, and diagnostic trouble codes (DTCs).
The Role of VCDS in Adaptation
VCDS is a powerful diagnostic tool that allows technicians to perform various functions on Audi vehicles, including turbo actuator adaptation. VCDS enables communication with the ECU to read and write specific values related to the turbocharger system. By using VCDS, technicians can access adaptation routines, monitor real-time data, and verify that the actuator is functioning correctly. This level of control and feedback is critical for achieving optimal turbocharger performance and reliability.
Common Symptoms Requiring Adaptation
Several symptoms may indicate the need for turbo actuator adaptation on an Audi 3.0 TDI engine. These include:
- Reduced engine power or performance.
- Erratic turbocharger behavior.
- Diagnostic trouble codes (DTCs) related to the turbocharger.
- Limp mode activation.
- Increased fuel consumption.
Addressing these symptoms promptly with proper adaptation can prevent further issues and ensure the vehicle operates as intended.
Potential Issues if Adaptation is Not Performed Correctly
Failure to perform turbo actuator adaptation correctly can lead to several problems, including:
- Incorrect boost pressure, causing engine damage.
- Continuous error codes and warning lights.
- Reduced fuel efficiency.
- Suboptimal engine performance.
- Potential damage to the turbocharger or engine components.
Due to the complexity and potential risks, it’s often best to seek assistance from experts, such as those at CAR-CODING.EDU.VN, to ensure the adaptation process is completed accurately.
2. Understanding the Audi 3.0 TDI Turbocharger System
The Audi 3.0 TDI turbocharger system is a sophisticated component designed to enhance engine performance and efficiency. It consists of several key parts that work together to deliver optimal boost pressure and engine output. Understanding these components is crucial for diagnosing and resolving turbocharger-related issues.
Key Components of the Turbocharger System
The main components of the Audi 3.0 TDI turbocharger system include:
- Turbocharger: The turbocharger itself consists of a turbine and a compressor. The turbine is driven by exhaust gases, which in turn spins the compressor to force more air into the engine.
- Turbo Actuator: This controls the vanes or flaps within the turbocharger, regulating boost pressure based on engine load and speed.
- Boost Pressure Sensor: Monitors the pressure of the air entering the engine and provides feedback to the ECU.
- ECU (Engine Control Unit): Manages the turbocharger system by adjusting the actuator and monitoring sensor data.
- Intercooler: Cools the compressed air from the turbocharger before it enters the engine, increasing air density and improving performance.
- Vacuum Lines and Solenoids: These components control the vacuum pressure that operates the turbo actuator.
How the System Works
The turbocharger system operates on the principle of using exhaust gases to drive a turbine, which in turn spins a compressor. The compressor forces more air into the engine, increasing the amount of oxygen available for combustion. This results in greater power output and improved engine efficiency. The turbo actuator plays a critical role in regulating the boost pressure by adjusting the vanes or flaps within the turbocharger. The ECU monitors various sensors, including the boost pressure sensor, to ensure the turbocharger operates within specified parameters.
Common Issues with the Turbocharger System
Several common issues can affect the Audi 3.0 TDI turbocharger system:
- Actuator Failure: The actuator can fail due to mechanical wear, electrical issues, or vacuum leaks.
- Boost Leaks: Leaks in the intake system can reduce boost pressure and engine performance.
- Sensor Malfunctions: Faulty boost pressure sensors can provide incorrect data to the ECU, leading to performance issues.
- Clogged Intercooler: A clogged intercooler can reduce the effectiveness of the cooling system, leading to decreased performance.
- Vacuum Line Leaks: Leaks in the vacuum lines can affect the operation of the turbo actuator.
Diagnosing Turbocharger Problems
Diagnosing turbocharger problems requires a systematic approach. Common diagnostic steps include:
- Scanning for Diagnostic Trouble Codes (DTCs): Use a diagnostic tool like VCDS to identify any error codes related to the turbocharger system.
- Inspecting Vacuum Lines and Connections: Check for leaks or damage in the vacuum lines and connections.
- Testing the Turbo Actuator: Use VCDS to test the actuator and verify it is functioning correctly.
- Checking Boost Pressure: Monitor boost pressure using VCDS to ensure it is within specified parameters.
- Inspecting the Intercooler: Check the intercooler for clogs or damage.
The Importance of Regular Maintenance
Regular maintenance is essential for keeping the Audi 3.0 TDI turbocharger system in good working order. This includes:
- Regular Oil Changes: Using high-quality oil and changing it regularly helps to lubricate the turbocharger and prevent wear.
- Inspecting and Replacing Air Filters: Clean air filters ensure that the turbocharger receives an adequate supply of clean air.
- Checking Vacuum Lines: Regularly inspect vacuum lines for leaks or damage.
- Monitoring Boost Pressure: Keep an eye on boost pressure using a diagnostic tool like VCDS.
By understanding the components of the turbocharger system, diagnosing common issues, and performing regular maintenance, you can ensure the Audi 3.0 TDI engine delivers optimal performance and reliability. For complex issues, CAR-CODING.EDU.VN provides expert remote support to diagnose and resolve turbocharger problems efficiently.
 uNQJFp5.jpeg
3. Step-by-Step Guide to Audi 3.0 TDI Turbo Actuator Adaptation Using VCDS
Adapting the turbo actuator on an Audi 3.0 TDI using VCDS requires a precise and methodical approach. This step-by-step guide will walk you through the process, ensuring accurate and effective adaptation.
Prerequisites
Before starting the adaptation process, ensure you have the following:
- VCDS Software and Interface Cable: Make sure you have the latest version of VCDS installed on your computer and a compatible interface cable to connect to the vehicle.
- Vehicle Information: Know the exact model year and engine code of your Audi 3.0 TDI.
- Battery Charger: Connect a battery charger to the vehicle to maintain a stable voltage during the adaptation process.
- Access to a Computer: Have a laptop or computer to run the VCDS software.
Step 1: Connect VCDS to the Vehicle
- Connect the VCDS Interface Cable: Plug the VCDS interface cable into the OBD-II port of your Audi 3.0 TDI. The port is usually located under the dashboard on the driver’s side.
- Turn on the Ignition: Turn the ignition key to the “ON” position, but do not start the engine.
- Launch VCDS Software: Open the VCDS software on your computer.
Step 2: Select the Control Module
- Select Control Module: In the VCDS software, click on “Select Control Module.”
- Enter Address 01 (Engine): Type “01” in the address field to select the engine control module.
- Click “Open Controller”: Click the “Open Controller” button to access the engine control module.
Step 3: Access Basic Settings
- Click “Basic Settings – 04”: In the engine control module, click on the “Basic Settings – 04” button.
- Enter Group Number: Enter the appropriate group number for turbo actuator adaptation. This number can vary depending on the specific engine code and model year. Common group numbers include “011” or “115”. Refer to the VCDS documentation or online resources for the correct group number for your vehicle.
- Click “Go!”: Click the “Go!” button to start the basic settings procedure.
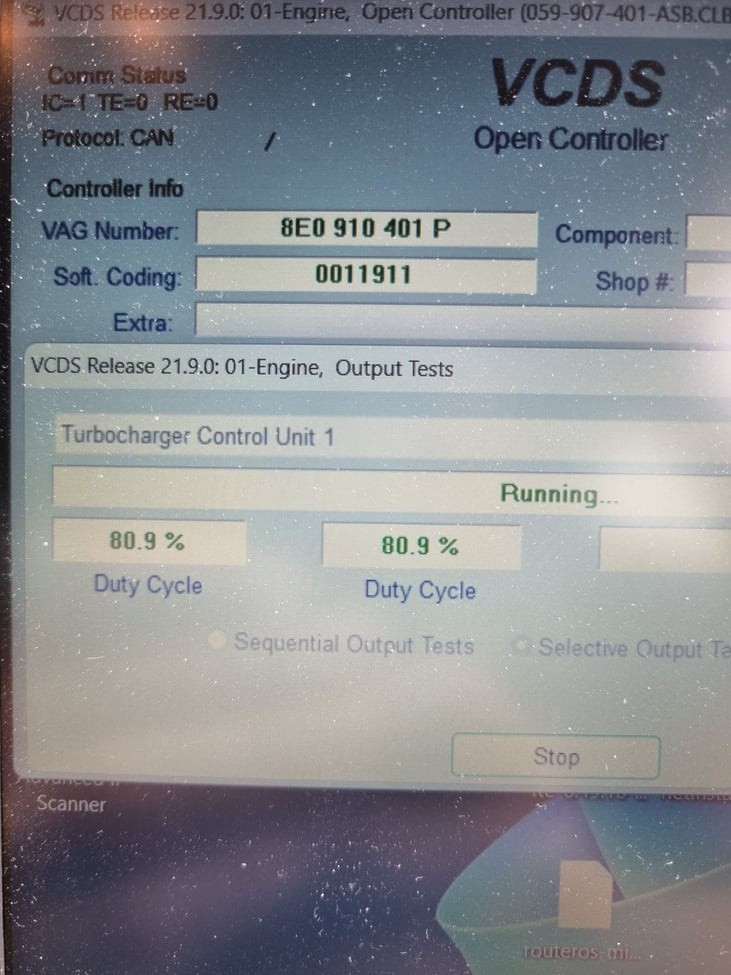
Step 4: Monitor the Adaptation Process
- Observe the Readings: VCDS will display various readings related to the turbo actuator. Monitor these readings closely to ensure they are within specified parameters.
- Wait for Completion: Allow the adaptation process to complete. VCDS will usually indicate when the process is finished. Do not interrupt the process.
- Check for Errors: If any errors occur during the adaptation process, note the error codes and troubleshoot accordingly.
Step 5: Verify the Adaptation
- Check for Diagnostic Trouble Codes (DTCs): After the adaptation is complete, check for any new or persistent diagnostic trouble codes. Clear any codes that may be present.
- Perform a Test Drive: Take the vehicle for a test drive to ensure the turbocharger is functioning correctly. Monitor boost pressure and engine performance.
- Monitor Actuator Movement: During the test drive, use VCDS to monitor the movement of the turbo actuator to ensure it is responding correctly to changes in engine load and speed.
Troubleshooting Common Issues
If you encounter issues during the adaptation process, consider the following troubleshooting steps:
- Incorrect Group Number: Double-check that you are using the correct group number for your vehicle.
- Low Battery Voltage: Ensure the battery voltage is stable by using a battery charger.
- Faulty Actuator: If the adaptation fails repeatedly, the turbo actuator may be faulty and need replacement.
- Wiring Issues: Check the wiring and connections to the turbo actuator for any damage or corrosion.
Tips for Successful Adaptation
- Use a Stable Power Supply: Ensure the vehicle has a stable power supply throughout the adaptation process.
- Follow VCDS Documentation: Refer to the VCDS documentation for specific instructions and group numbers for your vehicle.
- Monitor Readings Carefully: Pay close attention to the readings displayed by VCDS during the adaptation process.
- Perform a Test Drive: Always perform a test drive after the adaptation to ensure the turbocharger is functioning correctly.
By following this step-by-step guide, you can successfully adapt the turbo actuator on your Audi 3.0 TDI using VCDS. For those who prefer expert assistance, CAR-CODING.EDU.VN offers remote support to guide you through the process and ensure optimal results.
4. Common Issues and Solutions with Audi 3.0 TDI Turbo Actuator Adaptation
When performing turbo actuator adaptation on an Audi 3.0 TDI, technicians may encounter various issues that can hinder the process. Understanding these common problems and their solutions is crucial for efficient troubleshooting and successful adaptation.
Issue 1: Incorrect Group Number
Description: Using the wrong group number in VCDS can lead to adaptation failure or incorrect settings.
Solution:
- Verify the Correct Group Number: Consult the VCDS documentation, online resources, or the Ross-Tech Wiki for the correct group number for your specific Audi 3.0 TDI model and engine code.
- Double-Check Vehicle Information: Ensure that the vehicle information (model year, engine code) is accurate to find the correct group number.
Issue 2: Low Battery Voltage
Description: Low battery voltage during the adaptation process can cause communication errors and adaptation failure.
Solution:
- Connect a Battery Charger: Use a battery charger to maintain a stable voltage (typically around 12.5V) during the adaptation process.
- Ensure Good Battery Condition: Verify that the vehicle’s battery is in good condition and fully charged before starting the adaptation.
Issue 3: Faulty Turbo Actuator
Description: A defective or damaged turbo actuator may not respond correctly to the adaptation process, leading to repeated failures.
Solution:
- Test the Actuator: Use VCDS to perform output tests on the actuator to verify its functionality. Monitor its movement and response.
- Inspect the Actuator: Visually inspect the actuator for any signs of damage, such as cracks, corrosion, or loose connections.
- Replace the Actuator: If the actuator is found to be faulty, replace it with a new, OEM-quality actuator.
Issue 4: Wiring and Connection Problems
Description: Damaged or corroded wiring and connections to the turbo actuator can disrupt communication and cause adaptation issues.
Solution:
- Inspect Wiring: Check the wiring harness and connectors leading to the turbo actuator for any signs of damage, such as frayed wires, corrosion, or loose connections.
- Clean Connectors: Clean the connectors with electrical contact cleaner to ensure a good connection.
- Repair or Replace Wiring: Repair any damaged wiring or replace the wiring harness if necessary.
Issue 5: Communication Errors
Description: Communication errors between VCDS and the vehicle’s ECU can interrupt the adaptation process.
Solution:
- Check VCDS Connection: Ensure that the VCDS interface cable is securely connected to both the vehicle’s OBD-II port and the computer.
- Restart VCDS: Close and restart the VCDS software.
- Update VCDS Software: Make sure you are using the latest version of VCDS software.
- Test with Another Vehicle: If possible, test the VCDS interface cable with another vehicle to rule out a faulty cable.
Issue 6: Incorrect Adaptation Values
Description: Using incorrect adaptation values or settings can lead to suboptimal turbocharger performance or error codes.
Solution:
- Use Default Values: When possible, use the default or recommended adaptation values provided by VCDS or the vehicle manufacturer.
- Refer to Technical Documentation: Consult technical documentation or service manuals for the correct adaptation values for your specific vehicle.
- Seek Expert Advice: If you are unsure about the correct adaptation values, seek advice from experienced technicians or experts, such as those at CAR-CODING.EDU.VN.
Issue 7: Software Compatibility Issues
Description: Incompatibility between the VCDS software and the vehicle’s ECU can cause adaptation problems.
Solution:
- Update VCDS Software: Ensure that you are using the latest version of VCDS software, which includes updates and compatibility fixes.
- Check Compatibility: Verify that the VCDS software is compatible with the vehicle’s ECU version.
- Use a Different Computer: Try using a different computer with a different operating system to rule out software compatibility issues.
Issue 8: Turbocharger Mechanical Issues
Description: Mechanical issues within the turbocharger, such as sticking vanes or a damaged turbine, can affect the adaptation process.
Solution:
- Inspect Turbocharger: Visually inspect the turbocharger for any signs of mechanical damage or wear.
- Check Vane Movement: Ensure that the vanes within the turbocharger move freely and are not sticking.
- Replace Turbocharger: If the turbocharger is found to have mechanical issues, replace it with a new unit.
By addressing these common issues and implementing the appropriate solutions, technicians can overcome challenges and successfully perform turbo actuator adaptation on Audi 3.0 TDI engines. For complex or persistent problems, CAR-CODING.EDU.VN offers expert remote support to diagnose and resolve issues efficiently.
5. Benefits of Professional Remote Support for Audi Coding and Adaptation
Professional remote support offers numerous benefits for Audi coding and adaptation, ensuring accuracy, efficiency, and peace of mind. Services like those provided by CAR-CODING.EDU.VN can make a significant difference in resolving complex issues and optimizing vehicle performance.
Expertise and Experience
Benefit: Access to highly skilled technicians with extensive experience in Audi coding and adaptation.
Details:
- Specialized Knowledge: Experts possess in-depth knowledge of Audi’s complex systems and coding procedures.
- Troubleshooting Skills: Experienced technicians can quickly diagnose and resolve issues, saving time and reducing the risk of errors.
- Up-to-Date Information: Professionals stay current with the latest software updates, coding techniques, and diagnostic tools.
Time Efficiency
Benefit: Reduced downtime and faster resolution of coding and adaptation issues.
Details:
- Remote Assistance: Technicians can remotely access the vehicle’s system, eliminating the need for on-site visits or lengthy diagnostic procedures.
- Quick Diagnosis: Experts can rapidly identify the root cause of problems and implement effective solutions.
- Efficient Adaptation: Streamlined adaptation processes minimize the time required to calibrate and optimize vehicle systems.
Cost Savings
Benefit: Lower overall costs compared to traditional diagnostic and repair methods.
Details:
- Reduced Labor Costs: Remote support minimizes labor hours, resulting in significant cost savings.
- No Travel Expenses: Eliminate the need to pay for travel expenses associated with on-site visits.
- Preventative Measures: Expert guidance can help prevent costly mistakes and potential damage to vehicle systems.
Accuracy and Precision
Benefit: Ensuring coding and adaptation procedures are performed accurately and precisely.
Details:
- Expert Guidance: Professionals provide step-by-step guidance, ensuring that coding and adaptation processes are followed correctly.
- Error Prevention: Experts can identify and correct potential errors before they cause problems.
- Optimal Performance: Accurate coding and adaptation result in optimal vehicle performance, efficiency, and reliability.
Access to Advanced Tools and Software
Benefit: Utilizing advanced diagnostic tools and software for comprehensive coding and adaptation.
Details:
- VCDS Expertise: Professionals are proficient in using VCDS (VAG-COM Diagnostic System) for coding, adaptation, and diagnostics.
- Specialized Software: Access to specialized software and databases for coding and programming Audi vehicles.
- Remote Access Capabilities: Ability to remotely access and control vehicle systems for efficient coding and adaptation.
Customized Solutions
Benefit: Tailored coding and adaptation solutions to meet specific vehicle needs and customer preferences.
Details:
- Personalized Service: Experts provide personalized service based on the vehicle’s unique configuration and requirements.
- Feature Activation: Ability to activate hidden features and customize vehicle settings to enhance functionality and convenience.
- Performance Optimization: Coding and adaptation solutions designed to optimize engine performance, fuel efficiency, and overall driving experience.
Comprehensive Support
Benefit: Receiving comprehensive support throughout the coding and adaptation process.
Details:
- Step-by-Step Guidance: Experts provide clear, step-by-step instructions for coding and adaptation procedures.
- Troubleshooting Assistance: Technicians offer troubleshooting assistance to resolve any issues that may arise.
- Follow-Up Support: Continued support to ensure that coding and adaptation solutions are working correctly and to address any further concerns.
Risk Mitigation
Benefit: Minimizing the risk of coding errors and potential damage to vehicle systems.
Details:
- Expert Oversight: Professionals oversee the coding and adaptation process, reducing the risk of mistakes.
- Safety Measures: Implementing safety measures to protect vehicle systems from potential damage.
- Reliable Solutions: Ensuring that coding and adaptation solutions are reliable and long-lasting.
Convenience
Benefit: Conducting coding and adaptation procedures remotely, at your convenience.
Details:
- Remote Service: Access to professional coding and adaptation services from any location with an internet connection.
- Flexible Scheduling: Schedule coding and adaptation sessions at a time that is convenient for you.
- Reduced Downtime: Minimize vehicle downtime by performing coding and adaptation procedures remotely.
By leveraging professional remote support, technicians and vehicle owners can ensure accurate, efficient, and cost-effective coding and adaptation solutions for Audi vehicles. CAR-CODING.EDU.VN stands ready to provide expert assistance and comprehensive support for all your Audi coding and adaptation needs.
6. Activating Hidden Features on Audi 3.0 TDI with VCDS
Activating hidden features on an Audi 3.0 TDI using VCDS can unlock additional functionality and customize the vehicle to your preferences. These features are often disabled by default but can be enabled through coding changes. Here’s an overview of popular hidden features and how to activate them.
What Are Hidden Features?
Hidden features are functions or settings within a vehicle’s ECU that are disabled by the manufacturer but can be activated through coding. These features might be disabled for various reasons, such as market segmentation, regional regulations, or simply to streamline production.
Popular Hidden Features for Audi 3.0 TDI
-
Needle Sweep (Staging):
- Description: The instrument cluster needles perform a full sweep upon ignition, adding a sporty touch.
- Activation: Using VCDS, access the instrument cluster module (Address 17) and modify the adaptation settings to enable needle sweep.
-
Cornering Lights via Fog Lights:
- Description: The fog lights activate when turning at low speeds, providing additional illumination.
- Activation: Access the central electronics module (Address 09) and modify the coding to enable cornering lights via fog lights.
-
Emergency Brake Flashing:
- Description: The hazard lights automatically activate during hard braking to warn following drivers.
- Activation: Access the central electronics module (Address 09) and adjust the adaptation settings to enable emergency brake flashing.
-
Lap Timer:
- Description: Adds a lap timer function to the driver information system (DIS).
- Activation: Access the instrument cluster module (Address 17) and enable the lap timer function through coding.
-
Battery Meter:
- Description: Displays the battery voltage in the MMI screen, allowing you to monitor the battery’s health.
- Activation: Access the hidden menu in the MMI, then enable the battery meter display.
-
Comfort Windows:
- Description: Allows you to open and close the windows and sunroof using the remote key.
- Activation: Access the central convenience module and enable comfort windows through coding.
-
Acoustic Confirmation When Locking/Unlocking:
- Description: Emits a beep sound when locking or unlocking the car, providing audible confirmation.
- Activation: Access the central electronics module (Address 09) and modify the adaptation settings to enable acoustic confirmation.
-
DRL (Daytime Running Lights) Brightness Adjustment:
- Description: Adjust the brightness of the daytime running lights.
- Activation: Access the central electronics module (Address 09) and adjust the DRL brightness through adaptation channels.
Steps to Activate Hidden Features Using VCDS
-
Connect VCDS:
- Connect the VCDS interface cable to the OBD-II port of your Audi 3.0 TDI.
- Turn on the ignition but do not start the engine.
- Launch the VCDS software on your computer.
-
Select Control Module:
- Click on “Select Control Module” in VCDS.
- Enter the address of the module containing the feature you want to activate (e.g., Address 09 for central electronics, Address 17 for instrument cluster).
- Click “Open Controller.”
-
Coding or Adaptation:
- Depending on the feature, you may need to use either “Coding – 07” or “Adaptation – 10.”
- For coding, enter the new coding value as required.
- For adaptation, select the appropriate channel and enter the new value.
-
Test and Verify:
- After making the changes, test the new feature to ensure it is working correctly.
- Check for any diagnostic trouble codes (DTCs) and clear them if necessary.
Tips for Successful Activation
- Backup Original Coding: Before making any changes, always save the original coding values. This allows you to revert to the original settings if needed.
- Use Reliable Information: Consult reliable sources, such as the Ross-Tech Wiki or Audi forums, for accurate coding information.
- Be Careful: Incorrect coding can cause issues with your vehicle’s systems. If you’re unsure, seek help from a professional.
- Battery Voltage: Ensure the battery voltage is stable during the coding process to prevent errors.
Risks and Considerations
- Warranty: Modifying vehicle settings through coding may affect your warranty. Check with your dealer before making any changes.
- Compatibility: Ensure that the hidden features are compatible with your specific vehicle model and year.
- Potential Issues: Incorrect coding can lead to malfunctions or error codes. It’s essential to proceed with caution and seek expert help if needed.
Activating hidden features on your Audi 3.0 TDI can enhance your driving experience and add personalized touches to your vehicle. By following the steps outlined above and taking necessary precautions, you can safely unlock these features. For those who prefer expert assistance, CAR-CODING.EDU.VN offers remote support to guide you through the process and ensure successful activation.
7. Audi 3.0 TDI Turbo Actuator Replacement: A Quick Guide
Replacing the turbo actuator on an Audi 3.0 TDI requires careful attention to detail and a solid understanding of the turbocharger system. This guide provides a quick overview of the steps involved in the replacement process.
Prerequisites
Before starting the replacement, ensure you have the following:
- New Turbo Actuator: Purchase a new, OEM-quality turbo actuator that is compatible with your Audi 3.0 TDI model and engine code.
- Tools: Gather the necessary tools, including sockets, wrenches, screwdrivers, pliers, and a diagnostic tool like VCDS.
- Safety Gear: Wear safety glasses and gloves to protect yourself during the replacement process.
Step 1: Disconnect the Battery
- Locate the Battery: Find the battery in your Audi 3.0 TDI. It is typically located in the engine compartment or under the rear seat.
- Disconnect the Negative Terminal: Use a wrench to disconnect the negative terminal of the battery. This will prevent electrical shorts during the replacement process.
Step 2: Access the Turbo Actuator
- Locate the Turbo Actuator: The turbo actuator is located on the turbocharger, typically on the side or top of the turbocharger housing.
- Remove Air Intake Components: Remove any air intake components that may be blocking access to the turbo actuator. This may include the air filter housing, intake pipes, and hoses.
- Disconnect Electrical Connectors: Disconnect the electrical connector from the turbo actuator. Be careful not to damage the connector or wiring.
- Disconnect Vacuum Lines: If applicable, disconnect any vacuum lines from the turbo actuator.
Step 3: Remove the Old Turbo Actuator
- Loosen Mounting Bolts: Use a socket or wrench to loosen the mounting bolts that secure the turbo actuator to the turbocharger housing.
- Remove the Actuator: Carefully remove the old turbo actuator from the turbocharger. Note the orientation of the actuator for proper installation of the new unit.
Step 4: Install the New Turbo Actuator
- Position the New Actuator: Position the new turbo actuator on the turbocharger housing, aligning it with the mounting holes.
- Tighten Mounting Bolts: Tighten the mounting bolts to the specified torque.
- Connect Electrical Connectors: Connect the electrical connector to the new turbo actuator.
- Connect Vacuum Lines: If applicable, connect any vacuum lines to the new turbo actuator.
Step 5: Reassemble Components
- Reinstall Air Intake Components: Reinstall any air intake components that were removed to access the turbo actuator.
- Reconnect Battery: Reconnect the negative terminal of the battery.
Step 6: Perform Adaptation
- Connect VCDS: Connect the VCDS interface cable to the OBD-II port of your Audi 3.0 TDI.
- Perform Turbo Actuator Adaptation: Use VCDS to perform turbo actuator adaptation, as described in the previous section. This step is crucial for ensuring the new actuator functions correctly with the engine control unit (ECU).
Step 7: Test and Verify
- Start the Engine: Start the engine and let it idle for a few minutes.
- Check for Leaks: Check for any leaks around the turbo actuator and air intake components.
- Perform a Test Drive: Take the vehicle for a test drive to ensure the turbocharger is functioning correctly. Monitor boost pressure and engine performance.
- Check for Diagnostic Trouble Codes (DTCs): Check for any diagnostic trouble codes and clear them if necessary.
Tips for Successful Replacement
- Use OEM Parts: Always use OEM-quality turbo actuators to ensure proper fit and function.
- Follow Torque Specifications: Tighten mounting bolts to the specified torque to prevent leaks or damage.
- Perform Adaptation: Turbo actuator adaptation is crucial for proper operation of the new actuator.
- Inspect Components: Inspect all related components, such as vacuum lines and electrical connectors, for damage or wear.
Replacing the turbo actuator on an Audi 3.0 TDI can be a straightforward process if you follow these steps carefully. For those who prefer expert assistance, CAR-CODING.EDU.VN offers remote support to guide you through the replacement process and ensure optimal results.
8. Troubleshooting P3348 Error Code on Audi 3.0 TDI
The P3348 error code, indicating “Control Circuit for Controller for Turbocharger 1 (J724): Electrical Malfunction,” is a common issue in Audi 3.0 TDI engines. Addressing this error requires a systematic approach to diagnose and resolve the underlying problem.
Understanding the P3348 Error Code
Description: The P3348 error code indicates an electrical malfunction in the control circuit for the turbocharger actuator (J724) on Bank 1. This suggests a problem with the wiring, connections, or the actuator itself.
Symptoms:
- Reduced engine power or performance.
- Limp mode activation.
- Illuminated check engine light.
- Erratic turbocharger behavior.
- Increased fuel consumption.
Common Causes of P3348 Error Code
- Faulty Turbo Actuator: The actuator itself may be defective due to electrical or mechanical failure.
- Wiring Issues: Damaged, corroded, or loose wiring in the control circuit can cause an electrical malfunction.
- Connector Problems: Corroded or damaged connectors at the actuator or ECU can disrupt the electrical signal.
- Vacuum Leaks: Vacuum leaks in the vacuum lines controlling the actuator can affect its operation.
- ECU Malfunction: In rare cases, the ECU may be the source of the problem.
Diagnostic Steps for P3348 Error Code
-
Visual Inspection:
- Inspect the wiring and connectors leading to the turbo actuator for any signs of damage, corrosion, or loose connections.
- Check vacuum lines for leaks or damage.
-
Check Actuator Function:
- Use VCDS to perform output tests on the turbo actuator to verify its functionality. Monitor its movement and response.
- Manually move the actuator arm to check for smooth and unrestricted movement.
-
Test Wiring Continuity:
- Use a multimeter to test the continuity of the wiring between the ECU and the turbo actuator.
- Check for shorts to ground or shorts to voltage in the wiring.
-
Check Voltage Supply:
- Verify that the turbo actuator is receiving the correct voltage supply from the ECU.
- Check the voltage at the actuator connector with the ignition on.
-
Perform Basic Settings/Adaptation:
- Use VCDS to perform basic settings or adaptation of the turbo actuator.
- This can help to recalibrate the actuator and resolve minor electrical issues.
-
Check for Vacuum Leaks:
- Use a vacuum gauge to check for vacuum leaks in the vacuum lines controlling the actuator.
- Repair or replace any damaged vacuum lines.
-
ECU Testing:
- If all other components appear to be functioning correctly, the ECU may be the source of the problem.
- Test the ECU by swapping it with a known good unit or by having it tested by a specialized ECU repair service.
Solutions for P3348 Error Code
- Replace Turbo Actuator: If the turbo actuator is found to be faulty, replace it with a new, OEM-quality unit.
- Repair Wiring and Connectors: Repair any damaged wiring or replace corroded connectors.
- Replace Vacuum Lines: Replace any damaged or leaking vacuum lines.
- Perform Adaptation: After replacing the turbo actuator or repairing wiring, perform turbo actuator adaptation using VCDS.
- ECU Repair or Replacement: If the ECU is found to be faulty, have it repaired or replaced.
Tips for Troubleshooting P3348
- Use OEM Parts: Always use OEM-quality parts to ensure proper fit and function.
- Follow Diagnostic Procedures: Follow a systematic diagnostic procedure to accurately identify the root cause of the problem.
- Check Wiring Thoroughly: Thoroughly check wiring and connectors for any signs of damage or corrosion.
- Perform Adaptation: Always perform turbo actuator adaptation after replacing the actuator or repairing wiring.
Troubleshooting the P3348 error code on an Audi 3.0 TDI requires a methodical approach to diagnose and resolve the underlying problem. By following these steps and taking necessary precautions, you can effectively address this error and restore your vehicle’s performance. For those who prefer expert assistance, CAR-CODING.EDU.VN offers remote support to guide you through the troubleshooting process and ensure optimal results.
9. Choosing the Right VCDS Cable for Audi 3.0 TDI Coding
Selecting the appropriate VCDS (VAG-COM Diagnostic System) cable is crucial for effective coding, adaptation, and diagnostics on your Audi 3.0 TDI. The right cable ensures reliable communication between your computer and the vehicle’s ECU, enabling you to perform various functions accurately.
Key Considerations When Choosing a VCDS Cable
-
Compatibility:
- Vehicle Model and Year: Ensure the VCDS cable is compatible with your specific Audi 3.0 TDI model and year. Some cables may not support older or newer models.
- VCDS Software Version: Verify that the cable is compatible with the version of VCDS software you are using. Older cables may not work with the latest software versions.
-
Functionality:
- Full System Access: Choose a cable that provides full access to all vehicle systems, including engine, transmission, ABS, airbags, and more.
- Coding and Adaptation: Ensure the cable supports coding and adaptation functions, which are essential for activating hidden features and performing turbo actuator adaptation.
- Diagnostic Capabilities: Select a cable that offers comprehensive diagnostic capabilities, including reading and clearing diagnostic trouble codes (DTCs), viewing live data, and performing output tests.
-
Reliability:
- Genuine vs. Clone Cables: Opt for a genuine VCDS cable from Ross-Tech or an authorized reseller to ensure reliability and support. Clone cables may be cheaper but often lack reliability and can cause damage to your vehicle’s ECU.
- Build Quality: Look for a cable with high-quality construction and durable connectors.
-
Features:
- USB Interface: Most VCDS cables use a USB interface for connecting to your computer. Ensure your computer has a compatible USB port.
- Firmware Updates: Check if the cable supports firmware updates, which can improve compatibility and performance.
- Support and Documentation: Choose a cable that comes with comprehensive documentation and support from the manufacturer.
Recommended VCDS Cables for Audi 3.0 TDI
-
Ross-Tech HEX-V2:
- Description: The Ross-